Close
  • blinds-afterpay
Show

It’s incredibly Easy to measure your windows for Blinds, Curtains, Shutters & Awnings. Below you can find animated video guides as well as easy text & picture instructions.

If you have further questions, our friendly customer service team are available over the phone on 1300 011 561, email at contact@mydirectblinds.com.au, or live chat.

It’s best to print out and carry the instructions with you when measuring. You can find a measuring worksheet included in each printout. To get the printable pdf version simply click the red printer icon when browsing your product below.

Please be sure to take all your measurements to the exact millimetre (mm), do not round your measurements. Use a metal tape measure and measure each window separately. Do not take measurements from house plans. Do not make deductions for recess measurements as our factory does this to ensure a perfect fit.

  1. Always use a metal tape measure, a cloth tape measure will not be accurate
  2. We require all of your measurements in millimetres
  3. Do not round your measurements, we require the measurements to the exact millimetre (mm)
  4. Measure width then drop in this order, try not to get these mixed up
  5. Measure every window, there might be slight variations even if they are duplicate windows and this could affect your window furnishings fitting perfectly
  6. Do not take your measurements from house plans as they are not accurate
  7. If measuring with a partner, make sure the measurements are repeated out loud as they are written down
  8. Double, and triple check all details are correct before ordering and remember not to deduct anything off any Recess Fit measurements as our factory will do this to ensure a perfect fit

Measuring worksheet printout can be found here

What is an Under Roll and Over Roll?

1. Choose Recess or Face Fit

A Recess Fit (Inside Mount) fits on the inside of the window casing. A Face Fit (Outside Mount) will always hang on the architrave just above the window, or on the wall above the window if you have no architraves. We recommend a Recess Fit whenever possible.

Face Fit

Choosing Recess Fit

  • Number one mount type chosen, higher aesthetics than face mounted
  • Give your window a clean, simple look
  • Highlight attractive window architraves
  • Make your windows appear slimmer and your walls more spacious
Face Mount Outside Mount Fit

Choosing Face Fit

  • Minimise light gaps and offer more privacy
  • Make your window appear larger
  • Hide windows that are crooked or unattractive
  • Clear obstructions in the window recess (like winders, knobs, etc) that would interfere with a Recess Fit

2. Measuring for Roller Blinds

We only work with the total size, which is bracket to bracket, please do not provide us with ‘cloth width’ measurements, simply follow our easy instructions below to get the perfect fit every time

If you need to ask any questions, call or send us an e-mail, we’ll be happy to help

Video Guides

Recess Fit

Face Fit

Face Fit (No Architraves)

Text Guides

Printable PDF Version

Recess (Inside Fit) Roller Blinds

First, determine if you have enough depth to fit the blind within the recess

If you have enough depth in your recess then:

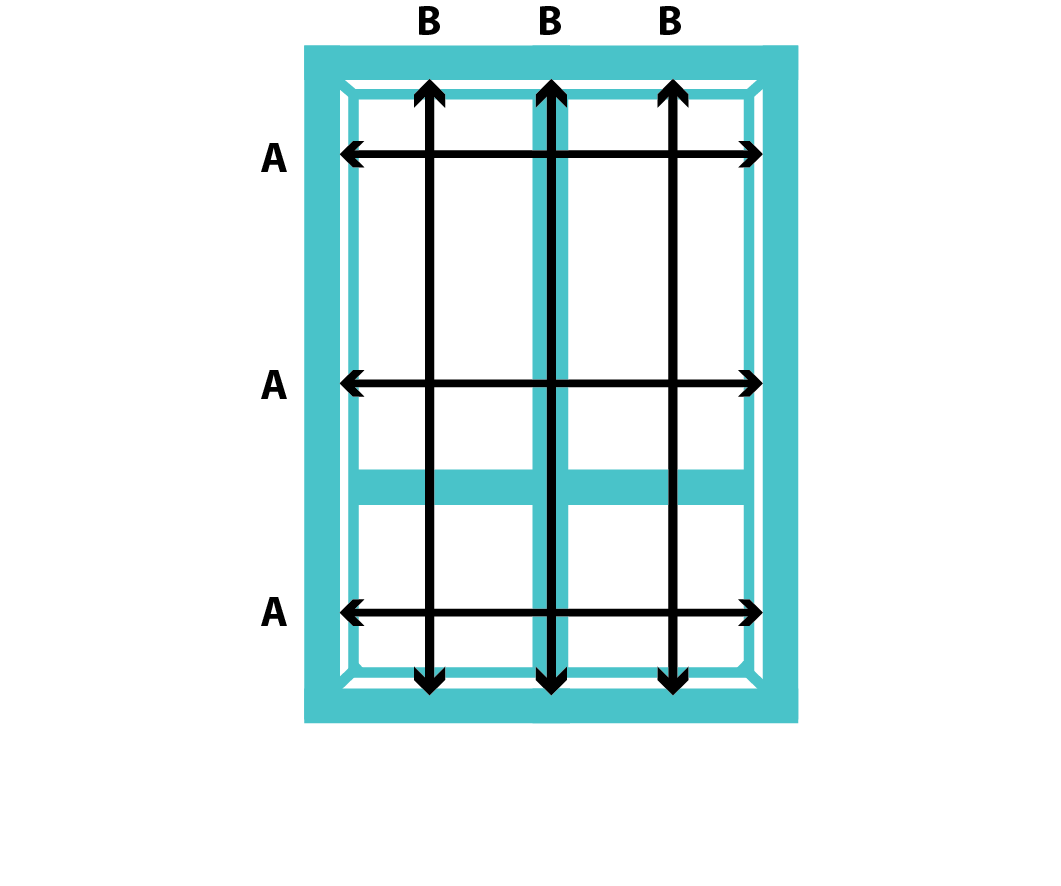
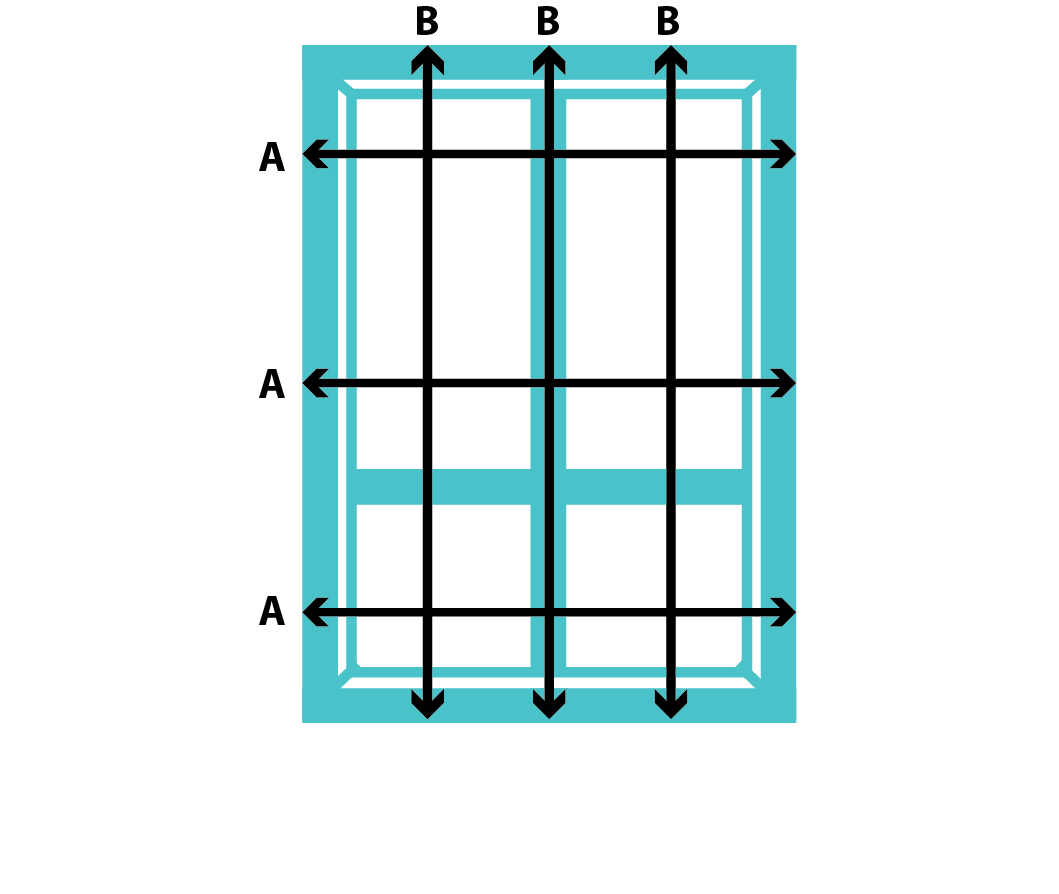
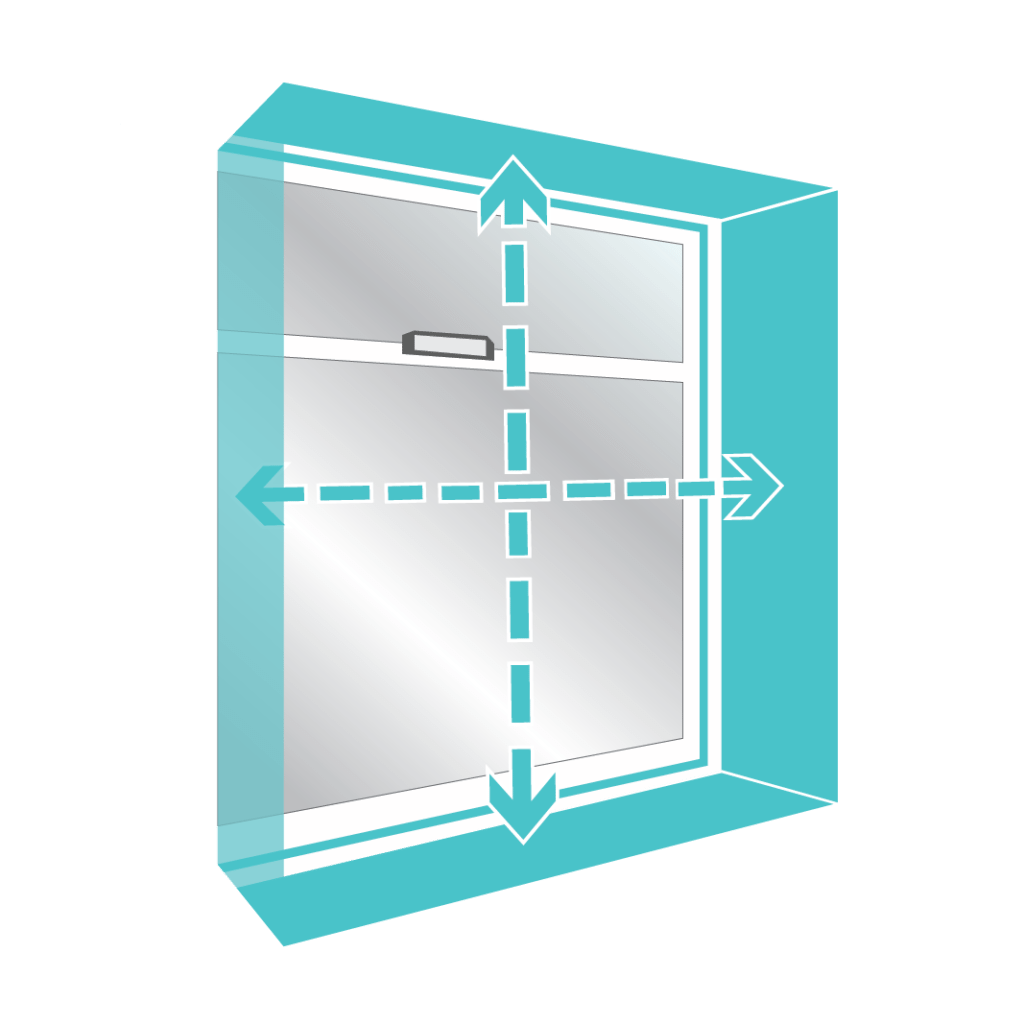
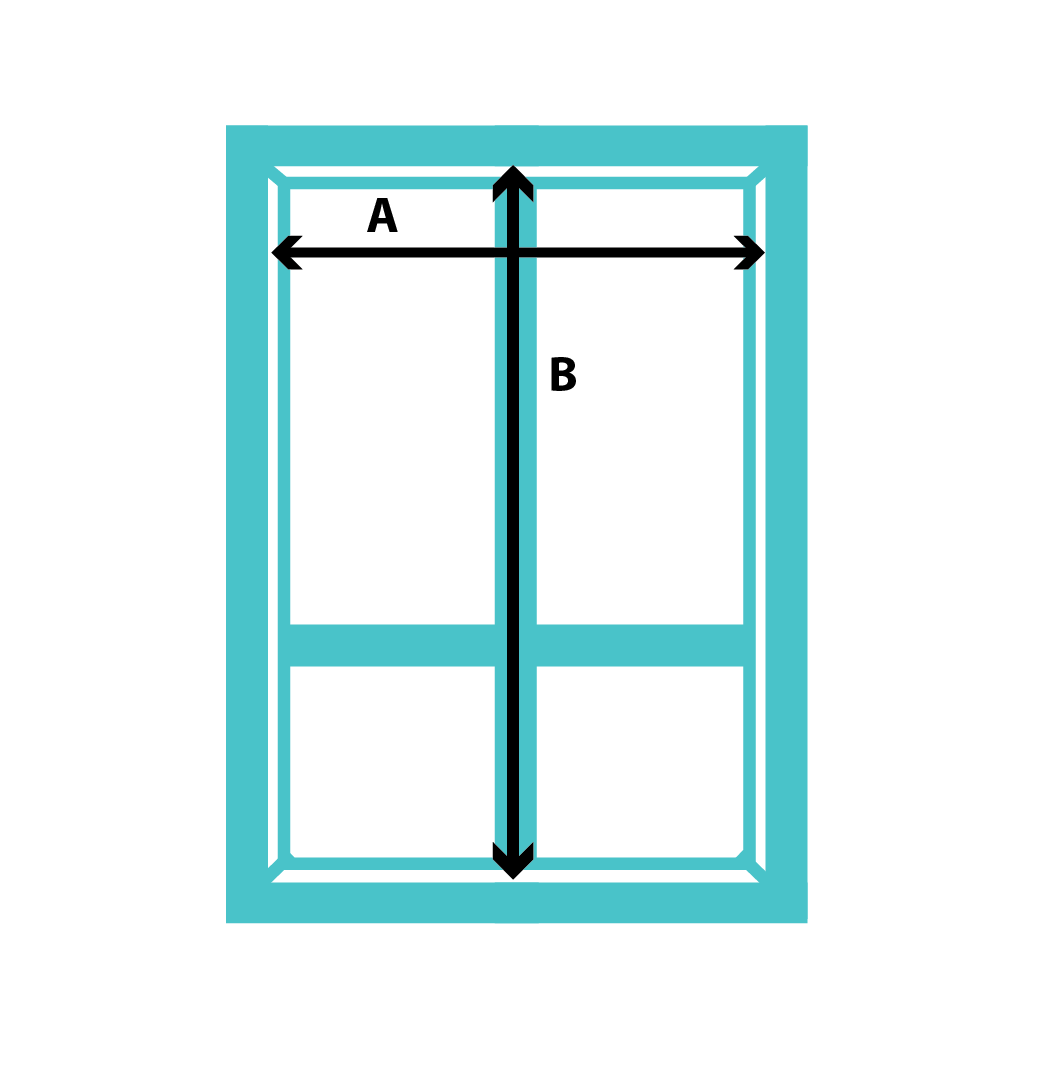
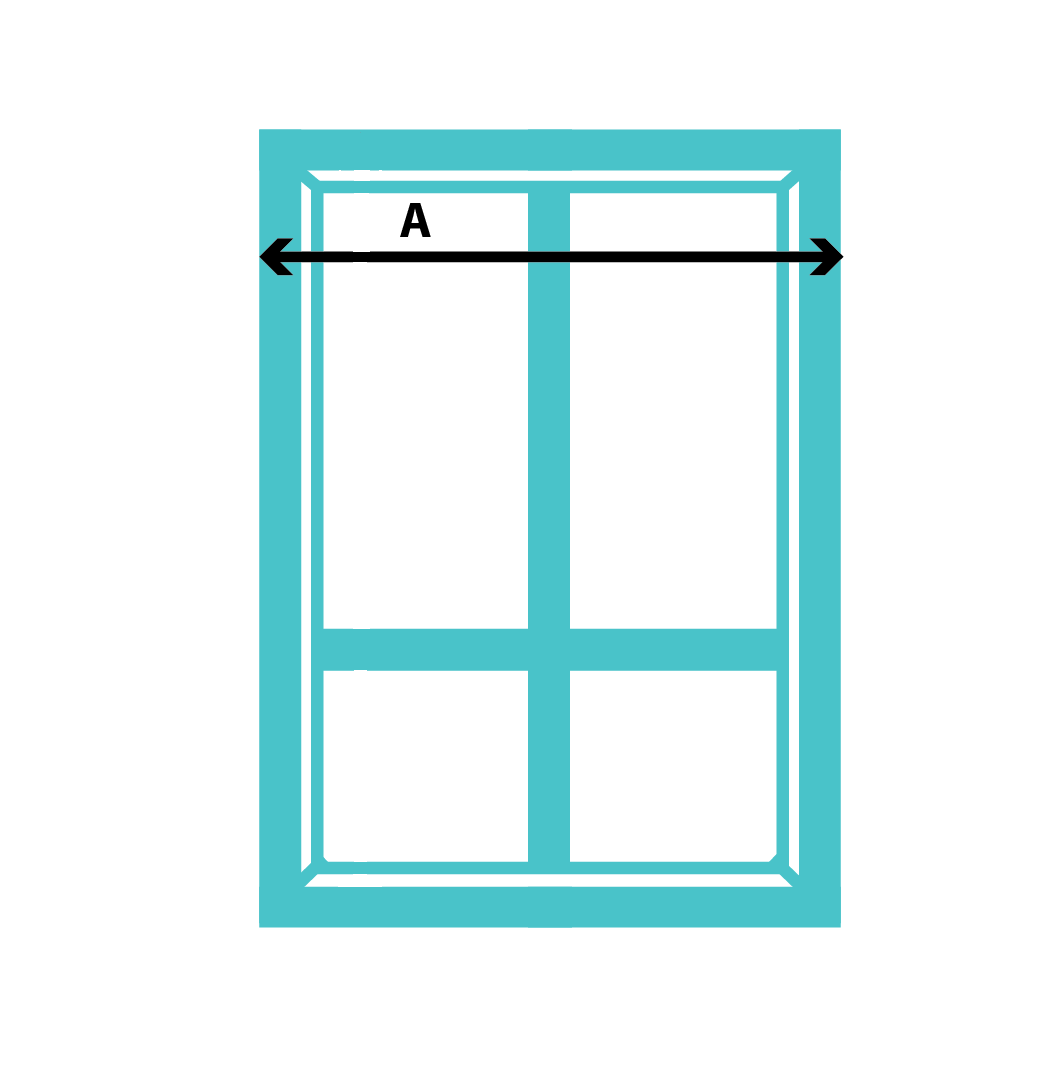
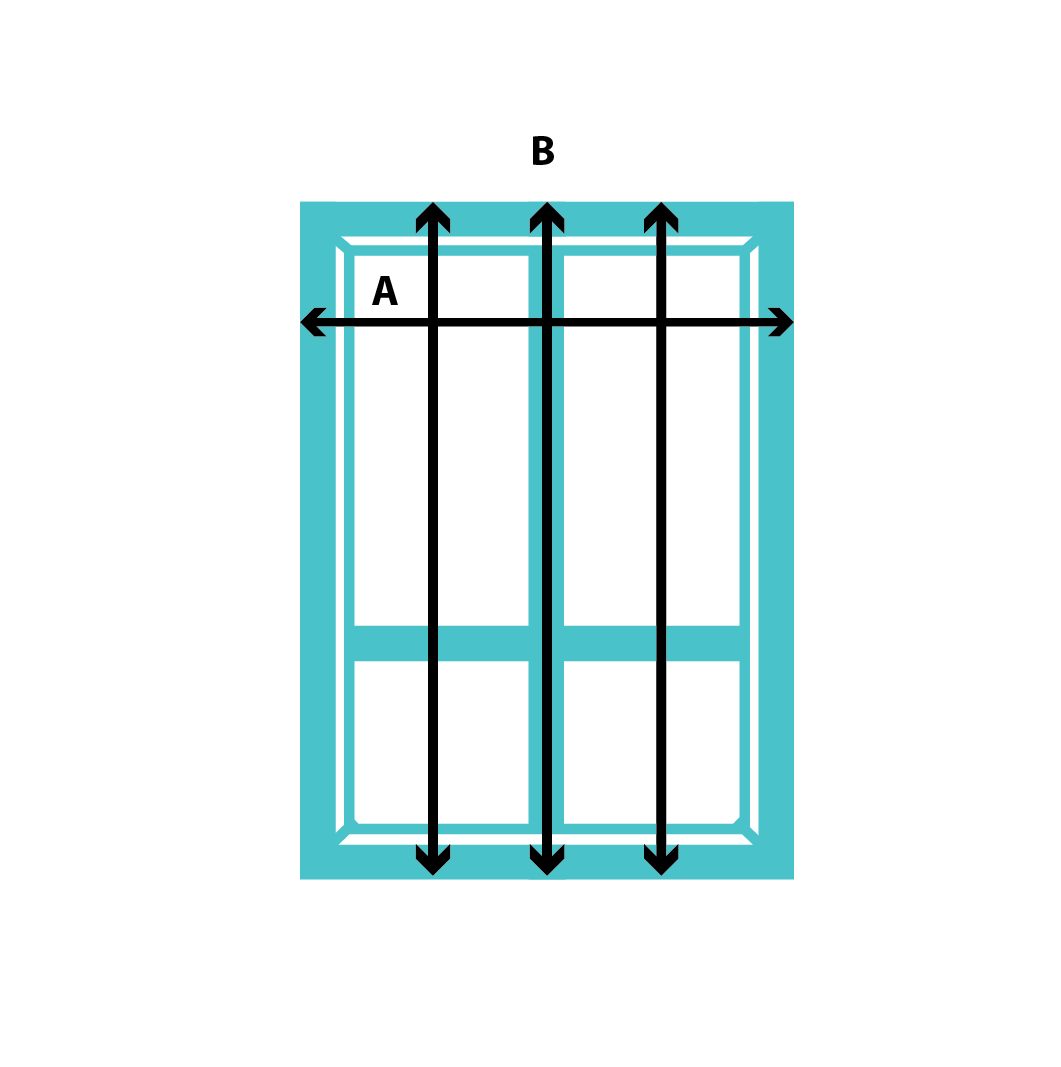
A.   Measure the width in mm on the inside of the window frame from left side to right side, at the top section of the opening as pictured.

B.   Measure the drop in mm from the top of the inside recess to the base of the inside sill.

Watch out for any obstructions within the recess such as window winders, knobs, handles, inwards opening windows, etc.

70mm of depth is Sufficient for our Single Roller Blind. As an over roll, the fabric and blind will sit fully inside the opening with this depth, and since the fabric will come over the top of the tube, it will clear any obstructions that are inside the opening.

For an Under Roll Single Roller Blind, you will need at least 45mm of space from the nearest obstruction to the front of the recess to mount the brackets and for the blind to fit. The Roller tube may protrude out into the room slightly at the top but the fabric will still be inside the opening due to the roll direction.

90mm of depth is Sufficient for our Slimline Bracket Dual Roller Blinds that are in a Double Over Roll configuration, this will ensure the blind is fully inside the opening, and will likely clear any obstructions as the fabric comes over the top of the tubes to the front of the room. Both blinds will be over rolled for a recess fit is our recommended set up for our Double Roller Blinds so that they will clear most obstructions inside of the opening.

For a Double Under Roll configuration, 70mm from the nearest obstruction is sufficient, the top part of the tube and bracket may protrude out slightly.

Important   DO NOT make any deductions or allowances to your Recess Fit measurements

If you do not have enough room for a recess fit, go for a face fix blind.

If you have tiles or splash backs part way up your recess which is often the case in kitchens and bathrooms, then the space between them is most likely to be the narrowest point in the recess. Measure at the top of the recess and then again between the tiles, then compare these two measurements. If the difference between the two is less than 24mm, use the measurement at the top. If it’s more, use the measurement between the tiles.

Face (Outside Fit) Roller Blinds

Watch out for any obstructions such as a protruding window sill, desk, beds, etc when deciding where your blind will drop to

For Face Fit, we will make your blind including brackets to your exact measurements you give us, we don’t use ‘cloth width’ measurements


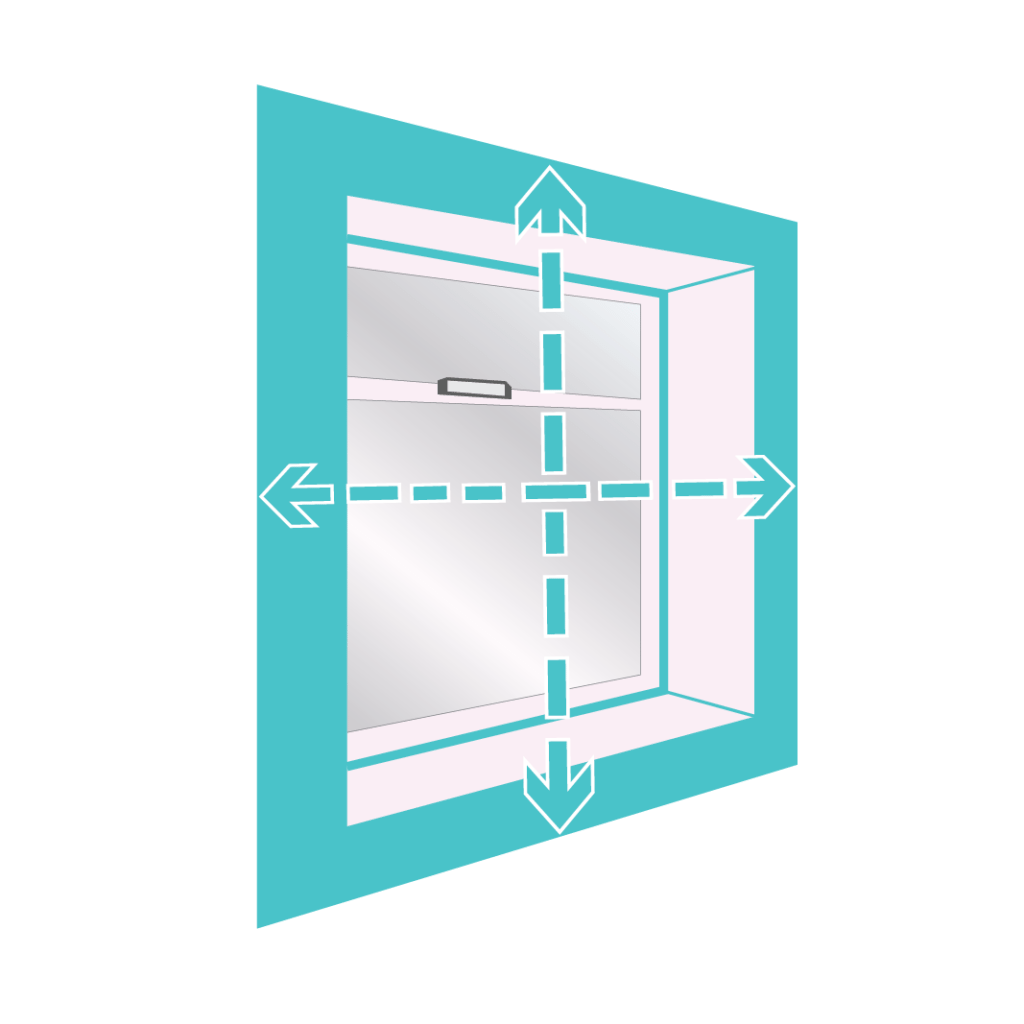
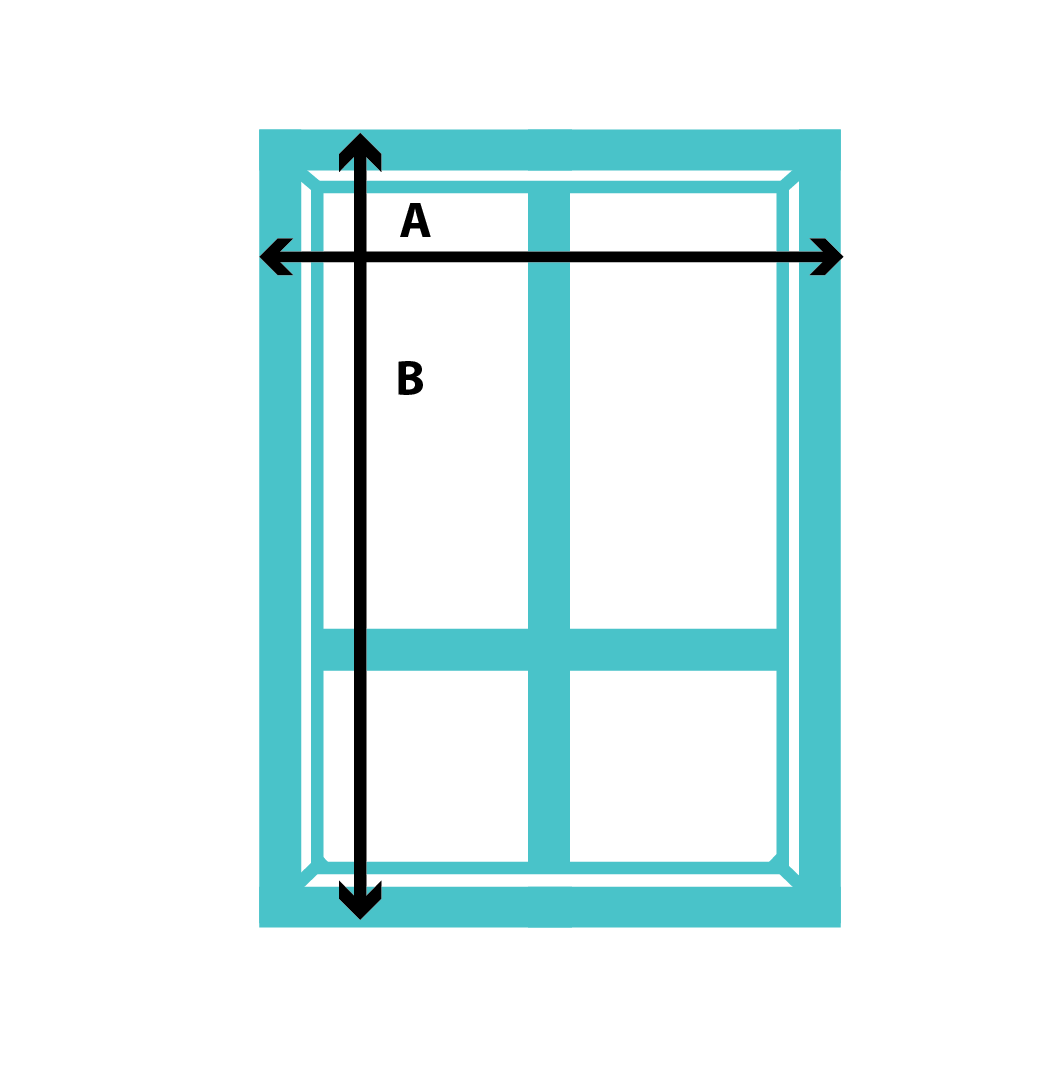
A.   Measure the width in mm from the outer edge of the architrave to the opposite edge, make sure you measure at the top of your architrave as this is where your blind will be mounted

B.   Measure the drop in mm from the top of the architrave to where you want the blind to finish


For shorter drop windows we recommend that you take the blind 100-200mm below the sill

An Under Rolled Blind is always recommended for Face Fits as the cloth sits closer to the wall to block more light


If you do not have Architraves (timber frame) around your Window


A.   Measure the width of the opening and add at least 100mm. This will allow the cloth to cover it by approximately 35mm past each side.

B.   Measure the drop from the top of the opening to where you want your blind to finish, add at least 100mm to allow the blind to be mounted above the opening.

Top Tip:

Double roller blind alternative: Two Single Roller Blinds, one within the recess, and one on the same window as a face fit under roll, and possibily finishing it off with a pelmet over the top. If you do this you need to make sure the inside blind is not protruding out into the room, so you will need the regular 70mm of recess depth for it to fit inside completely

Things to Know: Light Gaps for Recess Roller Blinds

There will be a gap between the cloth and side of the Recess of approximately 20mm on the chain control side and 10-20mm on the pin end side. This is to allow for the brackets and blind components to fit inside the reveal, the fabric must be cut narrower than the operating mechanisms at the top. Squareness of your windows could also exaggerate this gap.

Remember your window likely does not have glass running completely to the edge of the recess but rather into the actual glass frame, which should mitigate this gap

If potential light gaps are not acceptable for you, consider these options in spaces like Bedrooms, and Theater Rooms where you would prefer the most privacy and blockout:

  • Adding Drapery (Curtains) to cover the light gaps
  • Choosing an Under Rolled Face Fit, Roller Blind in it’s place, or adding one over the top of it on the same window (A Screen or light filter single blind inside, blockout single roller blind as an under roll face fix)
  • Adding a Roman Blind over the top of a Recess Screen or Light Filtering Blind
  • Choosing another product (eg. Shutters, Roman Blinds, Venetian Blinds)

For (inside window opening) recess fits measure the width of the window opening (in mm’s) in three spots (very top, middle, and very bottom), and use the smallest of the three measurements. Then measure the height of the window opening (in mm’s), in three spots (far left, middle, and far right), and use the smallest of the three measurements. Use this same measurement for your cassette and roller blind. Do not make any further deductions from your taken measurement.

For recess fits, you will need at least 50mm of depth from the nearest obstruction to the front of the window opening. If you have less than 90mm of depth, that will mean the headbox will protrude into the room slightly but will not detract from the look of the product. The headbox features side covers.

Tip: If you will be ordering a recess fit, depending on squareness of your windows an approximate 2mm or more overall gap will be present on the width and height, which you will likely need to fill with no gap silicon, in order to achieve full blackout. If your windows are out of square this gap may increase, you can also opt to install a small timber quad behind the channels to help achieve proper blackout. If you have ordered side channels and a headbox only, the product is slightly easier to install. If this might be an issue, we recommend face fixing the blinds for the easiest install.

For face fits with a timber architrave around your window, follow the regular face fit roller blind measurement instructions. Ensure you do not have decorative architraves that might interfere with the side channels and headbox sitting flush.

For face fit square set windows (no timber architrave around your window opening), measure the opening and add 101mm on top for the headbox, and at least 50mm on the left, right and bottom for the side channels to sit. If you opt for the top and side only channel system, then you will want to increase the length of the blind that runs past the bottom of the opening to help with light blockage. Ensure you have enough space above for the headbox and around the sides and bottom for the side channels. Ensure you do not have a protruding window sill at the bottom of your window opening.

Our roller blinds must be ordered together with the cassette system, as they fit only our system. It cannot be retrofitted to existing blinds as there are deductions made at the factory so that the roller blind can fit within the cassette, and the base rail is also made shorter for the same reason.

The roller blind must be ordered as an under roll, where the fabric comes to the back and behind the tube for it to be compatible with the cassette system.

Use the same measurement you have taken with these instructions here for your roller blind that will operate within the same cassette and window.

Measuring for Bonded or Custom Soft Padded Pelmets

If you need to ask any questions, call, talk with us via live chat, or send us an e-mail, we’ll be happy to help

Text Guides

Printable PDF Version

1. Determine the Width

Make sure there is enough space on either side for the Pelmet to go past.

If measuring for Pelmets over any Recess Fit Blind

A. Measure the width in mm from the outer edge of the architrave to the opposite edge, and then:

Add 60mm to your above total width measurement, so that the pelmet will go past your architrave by 30mm on each side

If measuring for Pelmets over any Recess Fit Blind on a window without architraves (timber frame)

A. Measure the width in mm of the opening, and then:

Add 60mm to your above total width measurement, so that the pelmet will go past your window opening by 30mm on each side

If measuring for Pelmets over a Face Fit Blind

If ordering for over a face fit blind, measure the exact width in mm of the blind from end bracket to end bracket. If you are ordering your pelmet together with a new face fitted blind then this should be the same width measurement you entered on that product, then:

Add 60mm to your above width measurement, so the pelmet will go past each side by 30mm

Nearly all face fix blinds run from either end of the architrave, check if your blind is measured or installed this way to ensure the returns clear the architrave.

2. Choose the Projection size on Order Page

The projection is how far into the room the pelmet will project from the wall, we make it easy to determine the projection by offering 5 set values to choose from on the order page, if you are placing more than one pelmet on the same wall it’s best to have the same projection size for all of them:

The Pelmet roof will sit on top of the architrave, and go around on either side, it does not sit directly on the architrave.

Keep in mind we use outbox measurements, we have accounted for this already below and made it easy for you to select a projection size depending on your product, however these measurements assume your architrave lip protrudes out 20mm from your plaster wall. If your architrave protrudes out more than this, then use one size up or specify a custom size projection in the checkout notes. eg 130mm projection.  See Diagram.

80mm

This projection option can be chosen for over any Recess fitted Blind

100mm

This projection option is our most popular choice over any Recess fitted Blind, or Face Fit Slimline 25mm Aluminum Venetian

120mm

This projection option is perfect for over any Roman Blind, any Face Fit Single Roller Blind, any Face Fit Venetian Blind.

150mm

This projection option is perfect for over any of our Double Roller Blind, Face Fix Single Curtain Track. If you have other Double Roller Blinds with a larger projection (not from us) then check this along with projection diagram instructions above to determine if it will cover it.

200mm

Suitable for over any Face Fit Vertical Blind, Double Curtain Track or Panel Glide Blind.

Measuring for Curtains

If you need to ask any questions, call, talk with us via live chat, or send us an e-mail, we’ll be happy to help

Text Guides

Printable PDF Version

Measuring the correct Width

Curtain Tracks

For a standard curtain track simply measure the full width of the track.

Curtain Tracks with Overlaps or Returns

If your track has an overlap in the centre:

A.    Measure the full width of the track

B.    Measure the overlap, if your track has one

C.    Measure the return, if your track has return brackets

D.    Measure the return, if your track has return brackets

Add them together and this will be your correct curtain width

Curtain Rod

Simply measure the width of the pole between any finials or end caps

Measuring the correct Drop

Again, curtains look best when going to the floor, the three options are:

  • For floating just above the floor, finish the measurement all the way to the floor then deduct 10mm-15mm
  • For breaking slightly on the floor – finish the measurement all the way to the floor then add 25-75mm
  • For pooling on the floor – finish the measurement all the way to the floor then add 75-150mm

Pencil & Pinch Pleat pole heading

When using a curtain pole, measure from the underside of the decorative ring to where you want the curtain to finish at the bottom. Take note if your rod has brackets in the middle or not, and whether your old curtains were one way or centre opening. If your rod has a centre support bracket you will need to order your curtain as centre opening (2 Panels) to ensure it can open.

Pencil & Pinch Pleat track heading

When using a curtain track, measure from the top of the track to where you want the curtain to finish at the bottom.

Add 10mm if you have a face fit track so that the curtain will sit above the track and conceal it.

For ceiling fit tracks, don’t deduct anything.

Eyelet heading

Simply measure from the top of the pole to where you want the curtain to finish at the bottom. We will make the curtain with 30mm of fabric above the rod automatically, no need to allow for it. Our eyelet heading curtains will fit poles up to 30mm in diameter. Take note if your rod has brackets in the middle or not, and whether your old curtains were one way or centre opening. If your rod has a centre support bracket you will need to order your curtain as centre opening (2 Panels) to ensure it can open.

1. Choosing where to Mount your Shutters

What is an architrave?
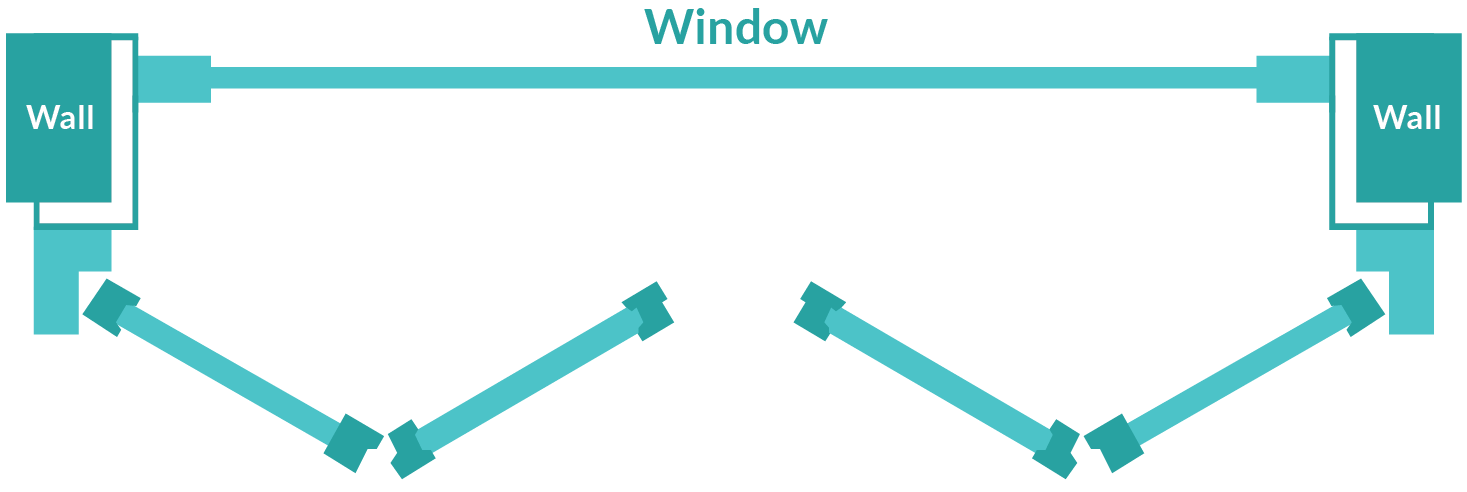
An architrave is the timber frame that most windows have around the edges, we’ve illustrated them as the white L shape in our diagrams.

Inside Mount Z-Frame

The Z-Frame is very generous in allowing for out of square windows as the lip curves around the opening of the window blocking any potential light gaps, because of this they are a lot easier to fit as well. This option can be used over a square or bullnose architrave, or with a square set window (eg. no architrave), If you have a decorative architrave such as those in victorian style homes, you may want to avoid a z-frame as it will cover part of the trim. The Z-Frame lip will cover 19mm, if you are unsure please send us a photo and we can advise if a Z-Frame and your architraves will work. A Z-Frame can also be made with a 3 sided frame and an L-Frame on the bottom for windows that have a protruding window sill.

Depth / Clearance needed for this mount type is 60mm

The depth listed above is from the front of the window opening to the back part of the opening, near the window glass.

See getting around obstructions section below, it is possible to get around this with less depth depending on where your obstruction is located.

Examples of obstructions: Window winders, aluminium window frame mullions, locks, latches, handles, etc.

How to get around obstructions?

Have 60mm (Z-Frame) or 70mm (L-Frame) of required window depth but have obstructions? You may still be able to fit your shutters as an inside fit.

How to get around obstructions for recess/inside fitted shutters

The overall depth requirement of your opening will still be the same as  listed at the start of this segment so that the blades can be fully opened. (eg. Z-Frame 60mm, L-Frame 70mm) If you do not have this then you cannot continue. This section is where you have obstructions that will eat into this depth requirement, but have these obstructions at specific places in your window, an example would be the very bottom, very top or middle of your window.

Example 1: Window winder in the middle of your window – Solution: Position the shutter mid rail over your winder, as you only need 30mm from the tip of the winder to the front of the recess.

Example 2: Window winder at the bottom of your window – Solution: The shutters will fit for nearly all windows with winders at the bottom that eat into the required depth above – as this depth is only needed for the shutter blades to open and shut. The blades/louvres do not operate in this area, as the shutter frame is positioned at the bottom, and the bottom part of the shutter panels will usually clear the winder in height so that the blades are opening above the winder. Even then, a cut out can be actioned if needed to the shutter frame.

If you’re unsure, it’s always best to send us a photo via email – with your depth measurements illustrated on the photo for us to evaluate.

Please contact us with a photo and we will advise if it is possible or not.

Inside Mount L-Frame

You should use this option if a Z-Frame is not suitable for your timber architraves around your window, provided you have enough depth in the recess to fit your shutters.

Depth / Clearance needed for this mount type is 70mm 

See getting around obstructions section below, it is possible to get around this with less depth depending on where your obstruction is located.

Outside Mount L-Frame

Use this option if you have obstructions within the recess, and not enough depth.

If fixing onto your architrave, you will require a flat outer corner surface on your architrave of about 20mm to mount the screws and L bracket

Please note we only provide shutters online for indoor standard windows, we are not currently supplying shutters for sliding doors, or outdoor shutters.

U-Channel

Used for room divider wall openings, very popular in a lot of the newer homes. Two U Channels on the top and the bottom will fix the shutters in position (The slats can open, but the panels will not) as hinging is not required. This method offers a very simple installation, good light block and very neat presentation when viewed from either side of the wall opening. Specify in the checkout extra field how many panels you would like in the u channel.

Direct Mount

The shutter panel will be hinged directly into the opening and the panel will not come with its own frame.

Bay & Corner Window Shutters

Please contact us with a photo via email and we’ll send you instructions.

2. Measuring for your Shutters

If you need to ask any questions, call, talk with us via live chat, or send us an e-mail, we’ll be happy to help

Text Guides

Printable PDF Version

First make sure that your windows are square enough if you are inside fitting – Important

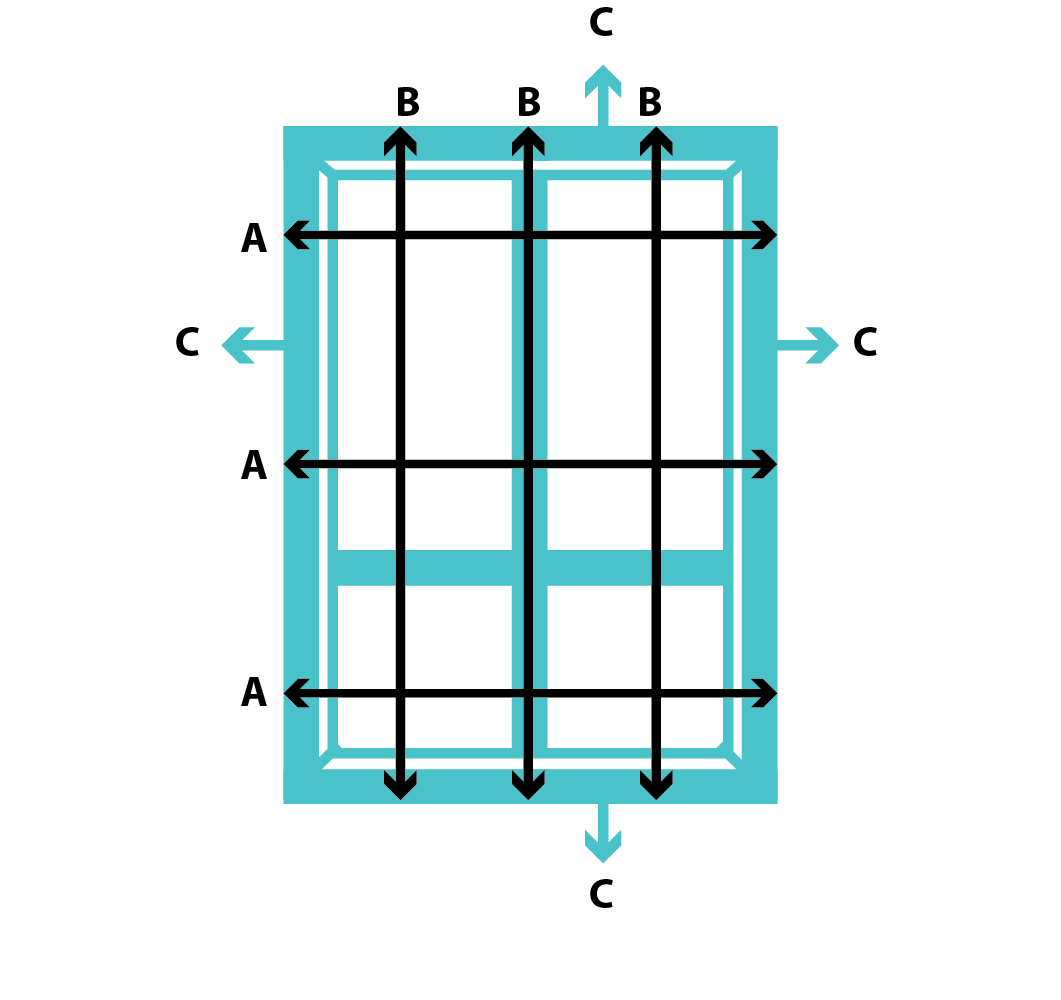
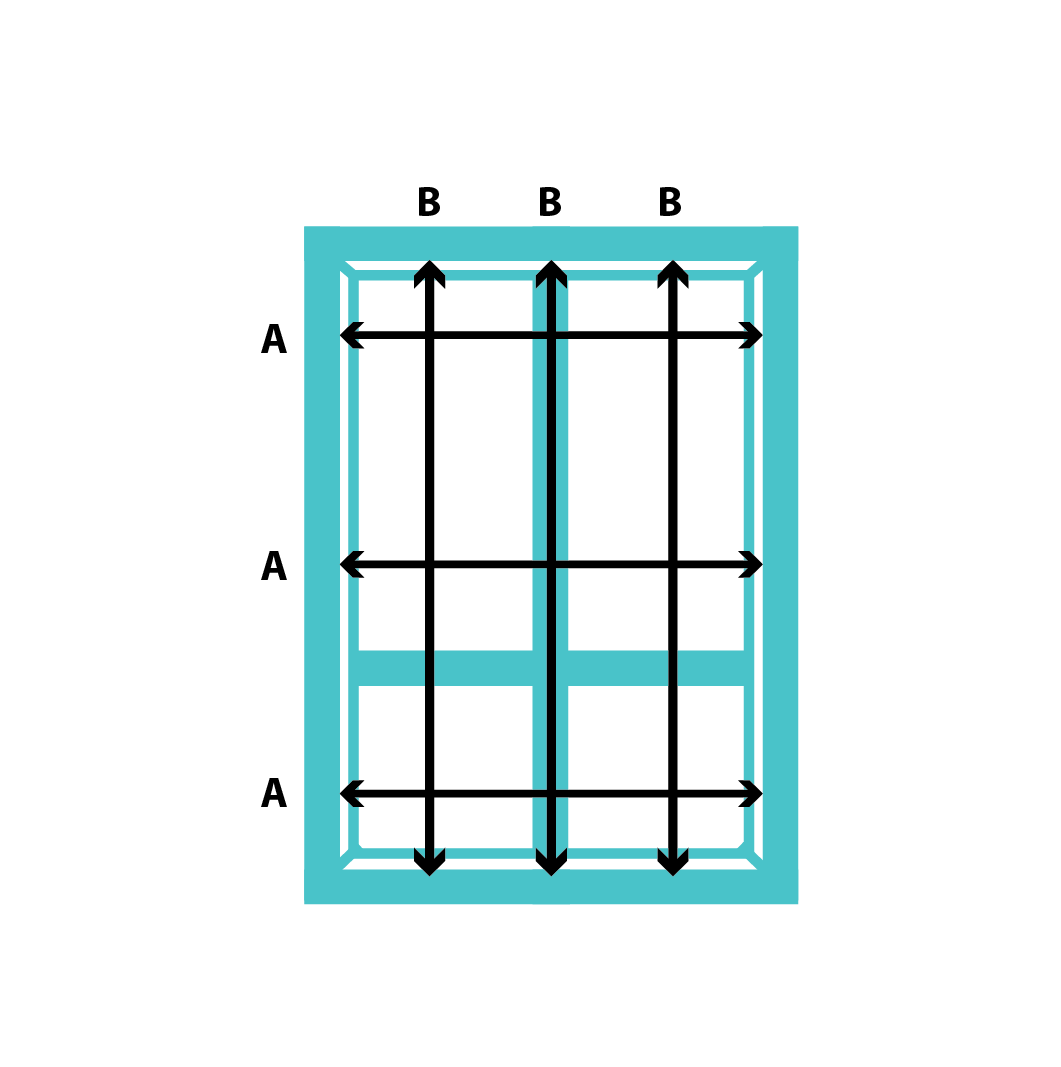
Measure the width in three spots, and the height in three spots as in the diagram below. If these vary by more than 6mm than an inside L-Fit may be unsuitable, if this varies by more than 12mm then a Z-frame is not suitable either and you must face fix your shutter or choose another product.

Measuring for Recess Z Frame, L Frame, Direct Mount or U-Channel

First determine if you have enough depth to mount your shutters in the recess

For Z-Frame Recess Mount 60mm is required so the blades can fully open

For L-Frame Recess Mount 70mm is required so the blades can fully open

Watch out for any obstructions such as window mullions, window winders, handles, protruding window frame, etc that will eat into this required depth. Please see the how to get around obstructions section below as in some cases depending where your obstruction is, you can get away with less.

For U-Channel in a wall opening Recess Mount at least 45mm of top and bottom surface in your opening is needed to mount the U-Channels

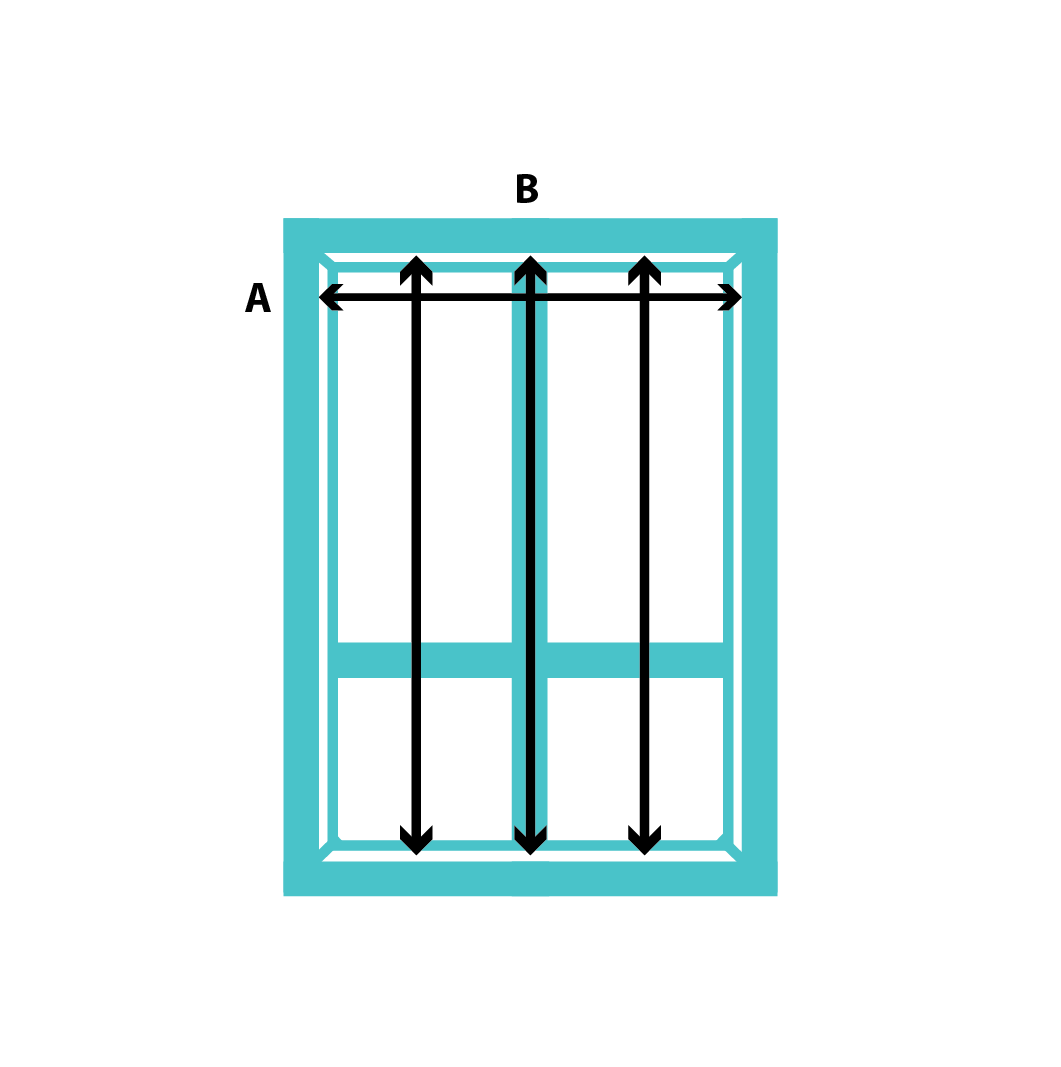
A.   Measure the width in mm’s in three places, Top, Centre and Bottom. Measure from the inside opening edge of the recess to the opposite edge. Use the smallest of the three measurements.

B.   Measure the drop in mm’s in three places, Left, Centre and Right. Measure from the top of the opening of the inside recess to the bottom of the inside sill. Use the smallest of the three measurements.

Important   DO NOT make any deductions or allowances on your Recess Fit measurements as our factory will do this to ensure a perfect fit

Important (For recess Z-Frames) If you have a protruding sill at the base of the window, measure the drop to the top of the sill, and make sure you select the “Yes” option for “Have Protruding Window Sill” on the shutter order page, a special bottom ‘Sill L frame’ will be made for the bottom part of the frame so that will sit nearly on top

Note: Inside Mount L-Frames can also be brought forward and mounted about 5-10mm out into the room to create a little more space without detracting from the look of the product. You can even mount them further out than this as long as the back part of the L-frame has a secure fixing point then it can be done however it might not be a look you prefer.

How to get around obstructions?

Have 60mm (Z-Frame) or 70mm (L-Frame) of required window depth but have obstructions? You may still be able to fit your shutters as an inside fit.

How to get around obstructions for recess/inside fitted shutters

The overall depth requirement of your opening will still be the same as  listed at the start of this segment so that the blades can be fully opened. (eg. Z-Frame 60mm, L-Frame 70mm) If you do not have this then you cannot continue. This section is where you have obstructions that will eat into this depth requirement, but have these obstructions at specific places in your window, an example would be the very bottom, very top or middle of your window.

Example 1: Window winder in the middle of your window – Solution: Position the shutter mid rail over your winder, as you only need 30mm from the tip of the winder to the front of the recess.

Example 2: Window winder at the bottom of your window – Solution: The shutters will fit for nearly all windows with winders at the bottom that eat into the required depth above – as this depth is only needed for the shutter blades to open and shut. The blades/louvres do not operate in this area, as the shutter frame is positioned at the bottom, and the bottom part of the shutter panels will usually clear the winder in height so that the blades are opening above the winder. Even then, a cut out can be actioned if needed to the shutter frame. The L-frame takes up 50mm in depth from the front of your window opening going back. The Z-frame takes up 40mm of depth. You will need this amount of space in front of your winder if it is at the bottom of your opening.

If you’re unsure, it’s always best to send us a photo via email – with your depth measurements illustrated on the photo for us to evaluate.

Please contact us with a photo and we will advise if it is possible or not.

Examples of obstructions: Aluminium window frame mullion, window winder, latch, handles, etc.

Measuring for Face Mount L-Frame with an Architrave

A.   Measure the width in mm’s in three places, Top, Centre and Bottom. Measure from the outer edge of the architrave to the opposite edge. Use the largest of the three measurements

B.   Measure the drop in mm’s in three places, Left, Centre and Right. Measure from the top of the architrave, to the bottom of the architrave. Use the largest of the three measurements.

We use the largest measurement for face fix as opposed to the smallest measurement on recess fits because we want the frame to cover the entire architrave and keep it hidden.

Measuring for Face Mount L-Frame without an Architrave

A.   Measure the width in three places, Top, Centre and Bottom. Measure from the left hand opening edge of the plaster to the opposite edge. Use the smallest of the three measurements.

B.   Measure the drop in three places, Left, Centre and Right. Measure from the top of the opening edge of the plaster to the bottom opening edge. Use the smallest of the three measurements.

C.   Add 42mm on each side (84mm total added to width and 84mm total added to drop) if you have no protruding window sill base otherwise Add 42mm on each side except bottom (84mm total added to width and 42mm total added to drop) if you have a protruding window sill base.

1. Choose Recess or Face Fit

A Recess Fit (Inside Mount) fits on the inside of the window casing. A Face Fit (Outside Mount) hangs on the architrave above the window, or on the wall above the window. We recommend a Recess Fit whenever possible.

Face Fit

Choosing Recess Fit

  • Number one mount type chosen, higher aesthetics than face mounted
  • Give your window a clean, simple look
  • Highlight attractive window architraves
  • Make your windows appear slimmer and your walls more spacious
Face Mount Outside Mount Fit

Choosing Face Fit

  • Minimise light gaps and offer more privacy
  • Make your window appear larger
  • Hide windows that are crooked or unattractive
  • Clear obstructions in the window recess (like winders, knobs, etc) that would interfere with a Recess Fit

2. Measuring for Timber Venetian Blinds

If you need to ask any questions, call, talk with us via live chat, or send us an e-mail, we’ll be happy to help

Video Guides

Recess Fit

Face Fit

Face Fit (No Architraves)

Text Guides

Printable PDF Version

Face (Outside Fit) Timber Venetian Blinds

Watch out for any obstructions such as a protruding window sill, desk, beds, et cetera when deciding where your blind will drop to

For Face Fit, we will make your blind including brackets to your exact measurements you give us


A.   Measure the width in mm from the outer edge of the architrave to the opposite edge

B.   Measure the drop in mm from the top of the architrave to where you want the blind to finish in 3 places – Left, Centre, Right and take the smallest of the three measurements

For shorter drop windows we recommend that you take the blind a further 30-100mm below the sill (in addition to measurement B)

For full length windows we recommend that you measure to 8mm off the floor

If you are putting our Custom Soft Padded Pelmet over your Venetian blind, the blind will need to be fixed into the roof of the pelmet, so please notify us in the checkout options that you will need recess brackets for your Venetian. Add the necessary drop to your blind if you are raising the pelmet above the architrave (As the blind will lift up by the same amount you lift your pelmet above the architrave, being top fixed). Keep in mind In box measurements, the pelmet roof is 20mm.

If you do not have Architraves (timber frame) around your Window


A.   Measure the width of the opening and add 30-100mm to allow the blind to go past the opening, this will provide better light and privacy control

B.   Measure the drop of the opening from the top to where you want your blind to finish, in 3 places – Left, Centre, Right and take the smallest of the three measurements

For shorter drop windows we recommend that you take the blind 30-100mm below the sill

For full length windows we recommend that you measure to 8mm off the floor

Then add 60mm so that the blind can be mounted above the opening

For fitting onto doors, please see mounting onto doors section

Recess (Inside Fit) Timber Venetian Blinds

First, determine if you have enough depth to mount the blind.

80mm is Sufficient, less will result in the blind protruding out of the recess.

Watch out for any obstructions within the recess such as window winders, knobs, handles, etc.

A.   Measure the width in mm on the inside of the window frame from left side to right side in three places (Top, Centre, Bottom) and use the smallest of the three measurements.

B.   Measure the drop in mm from the top of the inside recess to the base of the inside sill in 3 places – Left, Centre, Right and take the smallest of the three measurements


Important   DO NOT make any deductions or allowances on your Recess Fit measurements as our factory will do this to ensure a perfect fit

More on window winders and obstructions:

Some window winders have the ability to be collapsed on themselves, creating more space. If your window winder protrudes into your required depth clearance, we recommend face mounting your blind

Measuring for Roman Blinds

If you need to ask any questions, call, talk with us via live chat, or send us an e-mail, we’ll be happy to help

Video Guides

Face Fit

Text Guides

Printable PDF Version

roman_blind_measuring

Face Mount Roman Blinds

Roman Blinds should only be face mounted due to fabric settling and achieving proper light coverage of the window

A.   Measure the width in mm from the outer edge of the architrave to the opposite edge

B.   Measure the drop in mm from the top of the architrave to where you want the blind to finish

For shorter drop windows we recommend that you take the blind 50-100mm below the sill. Watch out for any obstructions such as a desk or bed. The Roman Blinds come standard with a 40mm headboard projection, this is all that’s needed for most users, if you need to clear a protruding window sill simply select a larger size headboard on the product order page.

For full length windows we recommend that you measure to 20mm off the floor, this will give enough clearance and allow the blind to have room to settle over time. For Romans with drops over 2200mm we recommend 30mm clearance off the floor.

C.   We recommend that you add 100-150mm to your drop measurement taken in step B, so that you can mount the blind above the architrave to allow the stack to clear as much glass vertically as possible when raised. This will allow more light into the room and is important when blinds are on or above doors to allow for opening clearance

D.   We recommend that you add 40-100mm on each side of the architrave (80-200mm total) to your width measurement in step A. This will help reduce the gap at the side of the blind providing better light control and more privacy

Headboard Size (Projection)

40mm is the default headboard size and will clear nearly all normal windows. Please select a larger headboard or projection size on the order page if you have a protruding window sill or any other obstruction and need to clear it.

For fitting onto doors, please see mounting onto doors section

If you do not have Architraves (timber frame) around your Window

Follow the same above steps, measure the opening. Add 20mm more to go past the opening a little further either side on the width and height (in addition to steps A and C), as there are no architraves (At least +40mm total on both the above width measurements and height measurements)

For fitting onto doors, please see mounting onto doors section

1. Choose Recess or Face Fit

A Recess Fit (Inside Mount) fits on the inside of the window casing. A Face Fit (Outside Mount) hangs on the architrave above the window, or on the wall above the window. We recommend a Recess Fit whenever possible.

Face Fit

Choosing Recess Fit

  • Give your window a clean, simple look
  • Highlight attractive window architraves
  • Make your windows appear slimmer and your walls more spacious
Face Mount Outside Mount Fit

Choosing Face Fit

  • Most popular mount type for Verticals
  • Minimise light gaps and offer more privacy
  • Make your window appear larger
  • Hide windows that are crooked or unattractive
  • Clear obstructions in the window recess (like winders, knobs, etc) that would interfere with a Recess Fit

2. Measuring for Vertical Blinds

If you need to ask any questions, call, talk with us via live chat, or send us an e-mail, we’ll be happy to help

Video Guides

Recess Fit

Face Fit

Face Fit (No Architraves)

Text Guides

Printable PDF Version

Recess (Inside Fit) Vertical Blinds

First, determine if you have enough depth to mount the blind.

100mm is Sufficient for our 89mm Slat Vertical Blinds, the minimum is 65mm however your slats will protrude when open but will not detract from the product

135mm is Sufficient for our 127mm Slat Vertical Blinds, the minimum is 80mm however your slats will protrude when open but will not detract from the product

Watch out for any obstructions within the recess such as window winders, knobs, handles, etc. most window winders would not pose a problem as when the slats are open they should be able to slot around them easily, the same is also true when the slats are closed as the blinds will not project as much into the recess. Our Vertical Blinds also do not have connecting chains at the bottom for a much more stylish finish so they cannot get caught. Some window winders are also able to be folded in on themselves to create more space.


A.   Measure the width in mm on the inside of the window frame from left side to right side. Make sure to measure at the top of the reveal and not the bottom of the window, as this is where your track will be mounted

B.   Measure the drop in mm from the top of the inside recess to the base of the inside sill or floor. Measure in 3 places – Left, Centre and Right and take the smallest of the three measurements


Important   DO NOT make any deductions or allowances on your Recess Fit measurements as our factory will do this to ensure a perfect fit

Face (Outside Fit) Vertical Blinds

Watch out for any obstructions such as a protruding window sill, desk, beds, et cetera when deciding where your blind will drop too

For Face Fit, we will make your blind including tracks and brackets to your exact measurements you give us


A.   Measure the width in mm from the outer edge of the architrave to the opposite edge

B.   Measure the drop in mm from the top of the architrave to where you want the blind to finish

For shorter drop windows

On shorter drop windows, If you do not have a protruding window sill base we recommend that you take the blind 50-100mm below the sill

For full length windows we recommend you measure to 10mm off the floor

C.   We recommend that you add 40-100mm on each side of the architrave (80-200mm total) to your width measurement in step A. This will help reduce the gap at the side of the blind providing better light control and more privacy Ensure there is enough room to do this either side


If you do not have Architraves (timber frame) around your Window


A.   Measure the width of the opening and add at least 120mm, this will allow more privacy and light control

B.   Measure the drop from the top of the opening to where you want your blind to finish, add at least 70-100mm to allow the blind to be mounted above the opening. Ensure you have this amount of space above so that the blind will fit.

1. Face or Ceiling Fit

A Face Fit (Outside Mount) hangs on the architrave. A Recess Fit (Inside Mount) fits on the inside of the window casing, and a Ceiling fit mounts off the roof.

A Ceiling fix panel glide blind is generally only suitable if you are doing a wall-to-wall top to bottom style look. It can be quite troublesome to hang such a heavy track and blind from the plaster ceiling, you will need suitable hollow grip wall anchors. Generally a ceiling fix panel glide blind is used as a room divider only. It is not possible to mount the track as a face fix and above your architraves (if you have them) as the brackets are only made for fixing directly on to the architrave, there is not enough room to accommodate the amount your architraves will project out. Face fix tracks must be mounted onto the architrave (if you have them).

Panel glides that are just fixed right onto the window architrave is the easiest installation option and hassle free to install.

Face Fit

Choosing Recess Fit

  • For Panel Glide Blinds specifically, we do not recommend ever recess fitting your blind. This is because when stacked back the panels will take up considerable space, meaning one part of your window will always be covered. This is not ideal unless you either do not care about this or have a very large window or sliding door. Panel Glides generally are only fitted on sliding doors as a face fix, because they look best running all the way to the floor as opposed to inside a small window.
Face Mount Outside Mount Fit

Choosing Face Fit

  • Most popular mount type for Panel Glide Blinds
  • Minimise light gaps and offer more privacy
  • Ensure the panels clear the door or window completely when stacked back
  • Make your window appear larger
  • Hide windows that are crooked or unattractive
  • Clear obstructions in the window recess (like winders, knobs, etc) that would interfere with a Recess Fit

2. Measuring for Panel Glide Blinds

If you need to ask any questions, call, talk with us via live chat, or send us an e-mail, we’ll be happy to help

Video Guides

Face Fit

Text Guides

Printable PDF Version

Face (Outside Fit) Panel Glide Blinds

Watch out for any obstructions such as a door handle that might protrude past your opening into your room, desk, beds, etc when deciding where your blind will drop too

For Face Fit, we will make your blind including tracks to your exact measurements you give us


A.   Measure the width in mm from the outer edge of the architrave to the opposite edge

B.   Measure the drop in mm from the top of the architrave to where you want the blind to finish

For shorter drop windows

On shorter drop windows, If you do not have a protruding window sill base we recommend that you take the blind 50-100mm below the sill

For full length windows we recommend you measure to 10mm off the floor

C.   We recommend that you take the track past the architrave each side as it will provide better privacy and light control. The amount you take your track past your architraves is purely personal preference. You can easily do this as the brackets that are supporting your track are fixed onto the architrave itself, meaning you can take the track wider without needing a fixing point. Watch out for any obstructions such as a bookcase or light switches, your wall ending, etc. Since the panel sizes will vary between 500-1000mm it’s important that you add at least 300mm on the stack side and at least 100mm on the non stack side so that you can ensure proper privacy and light block. If you want your panels to completely clear your doors and windows as much as possible then you can adjust the stack side additional measurement by more than your panel size.

Calculating your exact Panel Widths

It’s important to know the size of your panels so that you will not be disappointed once you receive the product, and to know how much past the architrave on the stack side to take your blind so that it can clear the glass.

To calculate your panel size use this formula: (Finished Track Width + ((Number of panels – 1)*70) / Number of Panels)

Example:

Say we are using a 4 panel track, and our finished track width is 3000mm, to work out the exact size of the panels we first work out the overlap sizing:

4 (number of panels) – 1 = 3   (Because we have 3 overlaps for a 4 panel track)

3 * 70 (The overlap amount in mm) = 210

3000 (finished width) + 210 = 3210

3210 / 4 (number of panels) = 802mm Panel Size


If you do not have Architraves (timber frame) around your Window


A.   Use above instructions to add as much as necessary for your stack side. If you don’t care about the panels covering your glass then measure the exact opening and add a further 400mm in total to the width. (100mm on the non stack side and 300mm on the stack side). Of course watch out for obstructions like large light switches, the wall ending, furniture, etc.

B.   Measure the drop from the top of the opening to where you want your blind to finish, add at least 70-100mm to allow the blind to be mounted above the opening.

Linked Roller Blinds and other Blinds over Sliding Doors & Extra Wide Windows

Printable PDF Version

Below you can find how to measure for butting venetian, roman, and linked roller blinds to cover extra wide openings and sliding doors.

Our Link system for Roller Blinds was designed to allow for multiple Blinds to be controlled using a single motor or chain control operation, with an added benefit of achieving minimal gaps between each Blind.

Traditional ‘Butted Blinds’ have a larger gap due to the need for two brackets between each Blind, but with linked Blinds there is only one intermediate bracket.

Linking Blinds is also essential to achieve widths greater than the max width of a single Roller Blind at 3000mm.

Linking Blinds is great for longer width sliding doors or larger width windows. You can also operate them independently, allowing you to open one Blind to use your door or window without having to open all of them.

Gap between Linked Blinds: 17mm

Gap between non Linked Blinds (Butted Blinds): 30mm+

How to order using our Link system (Roller Blinds)

You must add each individual Blind that is going to be linked to your cart separately

To do this follow these steps:

  1. Follow Measuring Instructions (The section below), and write down the measurements you will use for each Linked Blind
  2. Tick the ‘Linking Blinds’ check box on each Roller Blind that are going to be linked together
  3. Choose whether you are linking 2 or 3 Blinds together in total
  4. Choose the control settings and control configuration (Left / Right hand chains, or Motorised)
  5. State which Blind that it is in order of arrangement out of all the Linked together Blinds (eg. Left, Middle, or Right) for our reference
  6. Enter the widths of the other Blinds that you will eventually add to your cart so we can easily cross reference them on your order
  7. Make sure you use the same settings for the ‘control configuration’ step on each product, this also applies if you are motorising your Blinds as we split the cost of the motors evenly across all of the products that are linked

Easy!

Measuring for Linked Roller Blinds and other Blinds on large multi panel Windows or Sliding Doors

Face Mount

Measure the widths:

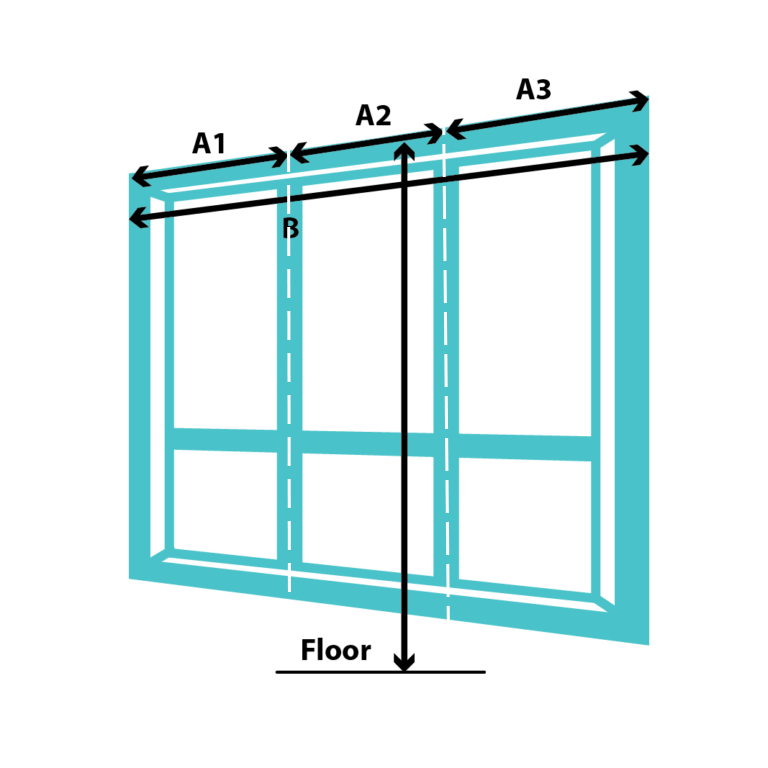
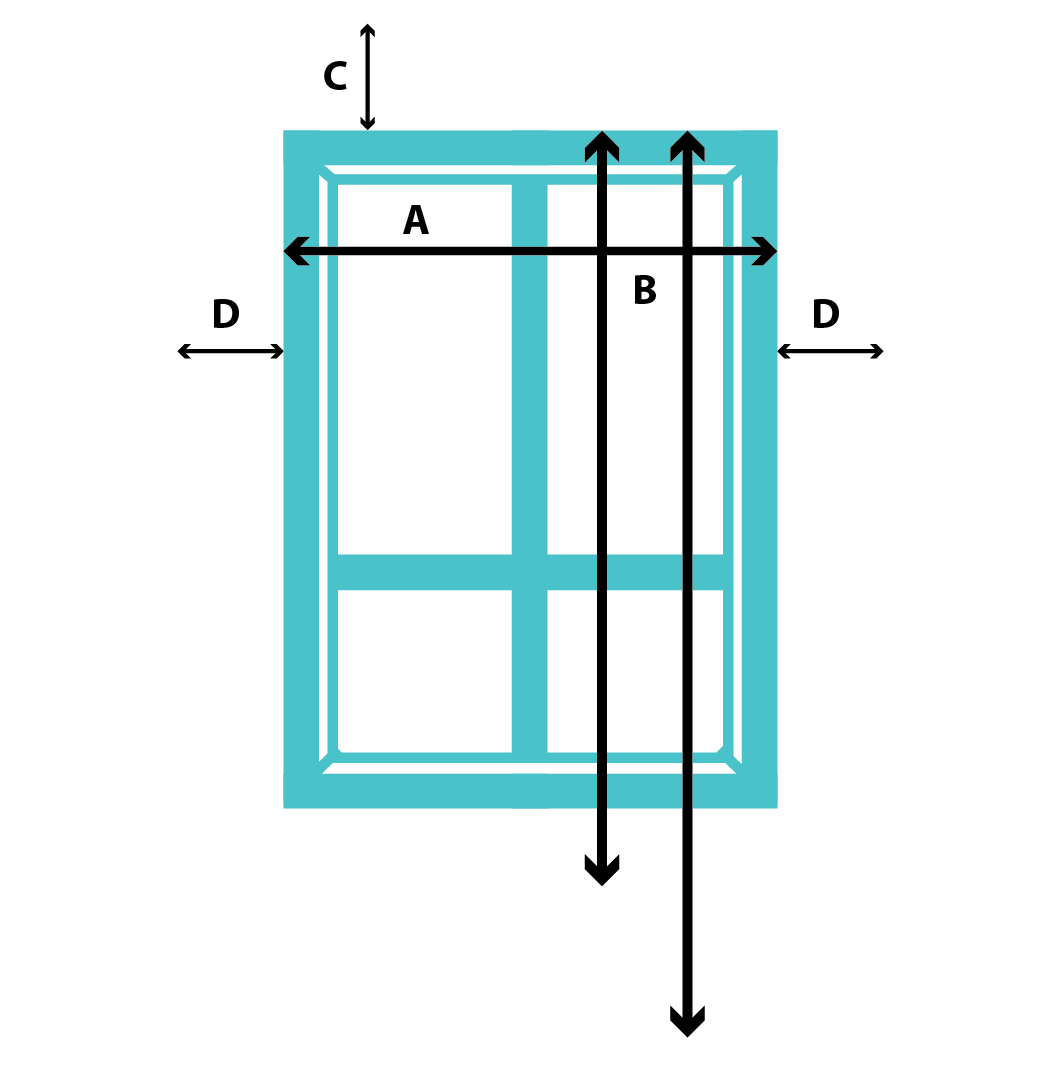
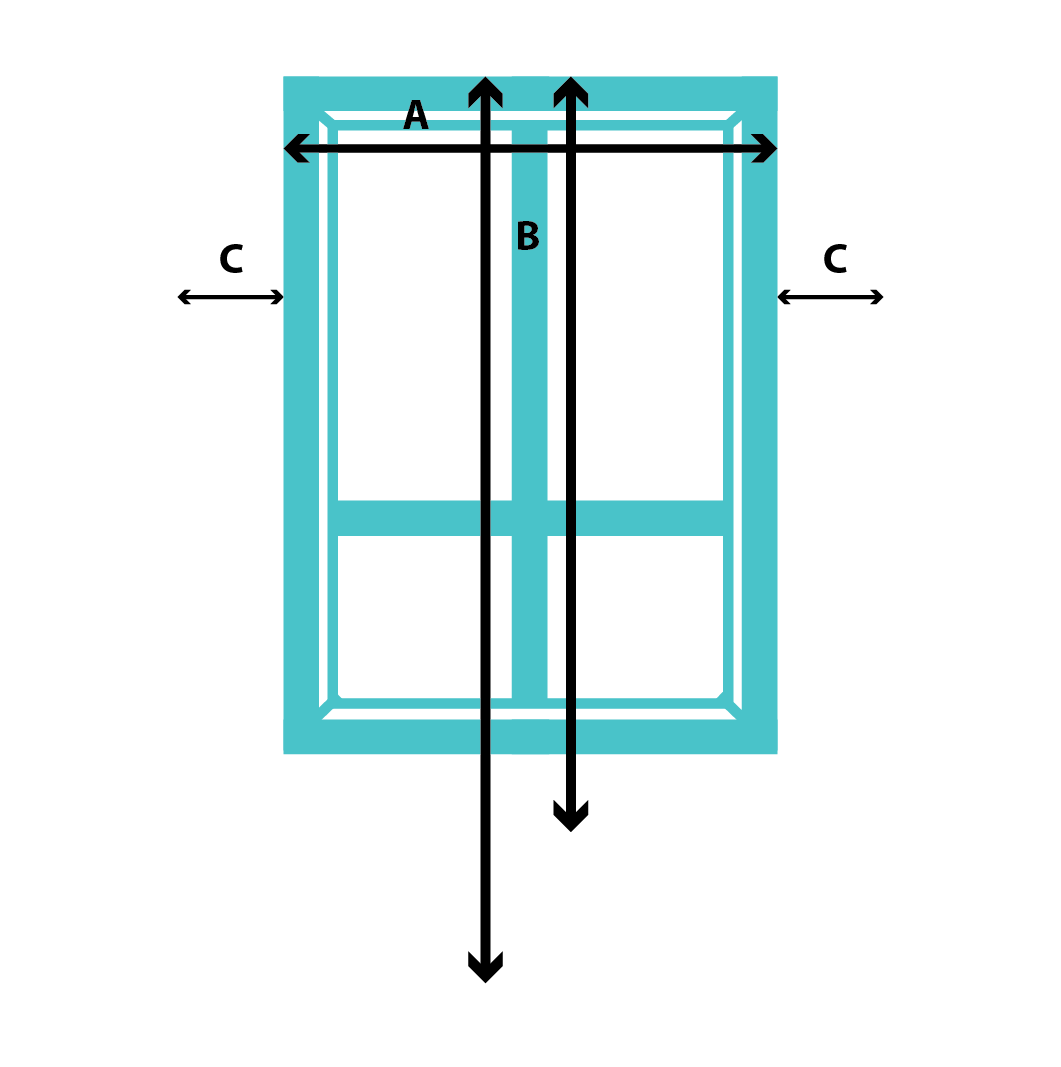
A1.  For the left hand blind, measure from the outside edge of the left architrave to the centre of the panel mullion in mm

A2.   For the central blind, measure from the centre point of the left mullion to the centre point of the right mullion in mm

A3.   For the right hand blind, measure from the outside edge of the right architrave to the centre of the panel mullion in mm

B.  Measure the overall width in mm from the left hand architrave edge across to the right hand architrave edge. Make sure all individual A. measurements add up to the overall width of B.

Drop: Reference to and follow the individual products measuring section, this section is only to illustrate how to measure for butting blinds.

For Recess Mount Windows

Same process except you are measuring from the inside of the reveal to the centre point mullions. Please note we do not recommend ever recess mounting a blind inside of  a sliding door opening as there is usually not enough space for this to happen

Do not make any deductions for Recess Fit Blinds as our factory does this to ensure a perfect fit.

Other notes

If you have only two sliding doors or panels, the measurement process is still the same as above, except you would obviously have only two blinds. The above example and picture is for illustrative purposes only. Since we limit our linked blinds to a maximum of three blinds on our order page, If you have above three mullions you can easily have one blind span across more than one panel or door, just make sure not to split the blind over a pane of glass, always have the blinds split over a centre point mullion. Otherwise you can contact us to enter an order manually for more than 3 linked blinds.

1. Choose Recess or Face Fit

A Recess Fit (Inside Mount) fits on the inside of the window casing. A Face Fit (Outside Mount) hangs on the architrave above the window, or on the wall above the window. We recommend a Recess Fit whenever possible.

Face Fit

Choosing Recess Fit

  • Number one mount type chosen, higher aesthetics than face mounted
  • Give your window a clean, simple look
  • Highlight attractive window architraves
  • Make your windows appear slimmer and your walls more spacious
Face Mount Outside Mount Fit

Choosing Face Fit

  • Minimise light gaps and offer more privacy
  • Make your window appear larger
  • Hide windows that are crooked or unattractive
  • Clear obstructions in the window recess (like winders, knobs, etc) that would interfere with a Recess Fit

Video Guides

Recess Fit

Face Fit

Face Fit (No Architraves)

2. Measuring for 25mm Aluminium Venetian Blinds

If you need to ask any questions, call, talk with us via live chat, or send us an e-mail, we’ll be happy to help

Text Guides

Printable PDF Version

Recess (Inside Fit) 25mm Aluminium Venetian Blinds

First, determine if you have enough depth to mount the blind.

60mm is Sufficient, less will result in the blind protruding out of the recess.

Watch out for any obstructions within the recess such as window winders, knobs, handles, etc.


A.   Measure the width in mm on the inside of the window frame from left side to right side in three places (Top, Centre, Bottom) and use the smallest of the three measurements

B.   Measure the drop in mm from the top of the inside recess to the base of the inside sill in 3 places – Left, Centre, Right and take the smallest of the three measurements


Important   DO NOT make any deductions or allowances on your Recess Fit measurements as our factory will do this to ensure a perfect fit

Face (Outside Fit) 25mm Aluminium Venetian Blinds

Watch out for any obstructions such as a protruding window sill, desk, beds, et cetera when deciding where your blind will drop too

For Face Fit, we will make your blind including brackets to your exact measurements you give us


A.   Measure the width in mm from the outer edge of the architrave to the to the opposite edge

B.   Measure the drop in mm from the top of the architrave to where you want the blind to finish in 3 places – Left, Centre, Right and take the smallest of the three measurements

For shorter drop windows we recommend that you take the blind 50-100mm below the sill

For full length windows we recommend that you measure to 8mm off the floor

For fitting onto doors, please see mounting onto doors section


If you do not have Architraves around your Window


A.   Measure the width of the opening and add 30-100mm to allow the blind to go past the opening, this will provide better light and privacy control

B.   Measure the drop of the opening from the top to where you want your blind to finish, in 3 places – Left, Centre, Right and take the smallest of the three measurements

For shorter drop windows we recommend that you take the blind 30-100mm below the sill

For full length windows we recommend that you measure to 8mm off the floor

Then add 30-100mm so that the blind can be mounted above the opening

For fitting onto doors, please see mounting onto doors section

1. Choose Recess or Face Fit

A Recess Fit (Inside Mount) fits on the inside of the window casing. A Face Fit (Outside Mount) hangs on the architrave above the window, or on the wall above the window. We recommend a Recess Fit whenever possible.

Face Fit

Choosing Recess Fit

  • Number one mount type chosen, higher aesthetics than face mounted
  • Give your window a clean, simple look
  • Highlight attractive window architraves
  • Make your windows appear slimmer and your walls more spacious
Face Mount Outside Mount Fit

Choosing Face Fit

  • Minimise light gaps and offer more privacy
  • Make your window appear larger
  • Hide windows that are crooked or unattractive
  • Clear obstructions in the window recess (like winders, knobs, etc) that would interfere with a Recess Fit

2. Measuring for 50mm Aluminium Venetian Blinds

If you need to ask any questions, call, talk with us via live chat, or send us an e-mail, we’ll be happy to help

Video Guides

Recess Fit

Face Fit

Face Fit (No Architraves)

Text Guides

Printable PDF Version

Recess (Inside Fit) 50mm Aluminium Venetian Blinds

First, determine if you have enough depth to mount the blind.

70mm is Sufficient, less will result in the blind protruding out of the recess.

Watch out for any obstructions within the recess such as window winders, knobs, handles, etc.


A.   Measure the width in mm on the inside of the window frame from left side to right side in three places (Top, Centre, Bottom) and use the smallest of the three

B.   Measure the drop in mm from the top of the inside recess to the base of the inside sill in 3 places – Left, Centre, Right and take the smallest of the three measurements


Important   DO NOT make any deductions or allowances on your Recess Fit measurements as our factory will do this to ensure a perfect fit

More on window winders and obstructions:

Some window winders have the ability to be collapsed on themselves, creating more space. If your window winder protrudes into your required depth clearance, we recommend face mounting your blind

Face (Outside Fit) 50mm Aluminium Venetian Blinds

Watch out for any obstructions such as a protruding window sill, desk, beds, et cetera when deciding where your blind will drop too

For Face Fit, we will make your blind including brackets to your exact measurements you give us


A.   Measure the width in mm from the outer edge of the architrave to the to the opposite edge

B.   Measure the drop in mm from the top of the architrave to where you want the blind to finish in 3 places – Left, Centre, Right and take the smallest of the three measurements

For shorter drop windows we recommend that you take the blind 30-100mm below the sill

For full length windows we recommend that you measure to 8mm off the floor

If you are putting our Custom Soft Padded Pelmet over your face fix Venetian blind, the blind will actually need to be fixed into the roof of the pelmet, so order it as a recess fit. Add the necessary drop to your blind if you are raising the pelmet above the architrave.

For fitting onto doors, please see mounting onto doors section

If you do not have Architraves around your Window


A.   Measure the width of the opening and add 30-100mm to allow the blind to go past the opening, this will provide better light and privacy control

B.   Measure the drop of the opening from the top to where you want your blind to finish, in 3 places – Left, Centre, Right and take the smallest of the three measurements

For shorter drop windows we recommend that you take the blind 30-100mm below the sill

For full length windows we recommend that you measure to 8mm off the floor

then add 60mm so that the blind can be mounted above the opening

For fitting onto doors, please see mounting onto doors section

1. Deciding the Run Through and Butting Blind

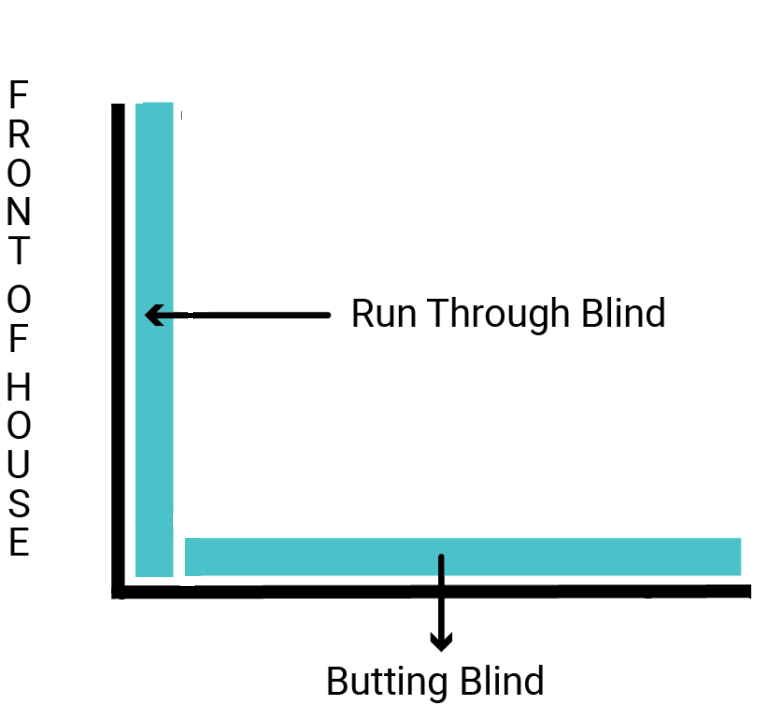
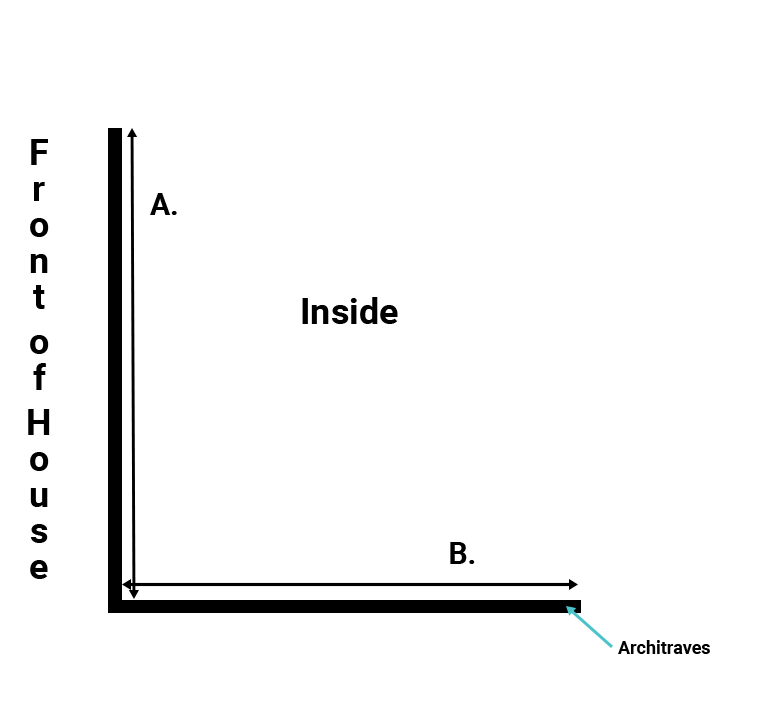
When mounting your blinds into a corner window, one blind will run through and one blind will butt into the other blind, as shown in the diagram.

First you must decide which blind will be the one to run through. We generally recommend that the blind running through is the one that is facing the front of the house or where you want to achieve the most privacy, to stop vision down the gap between the butting blind.

Tip: If you are having trouble visualising the corner because it’s on a different angle, when printing out this section/page simply rotate the page so it aligns with how the corner looks in person.

2. Measuring for Corner Windows

Please be sure to state in the window name on the order page that it is for a corner window.

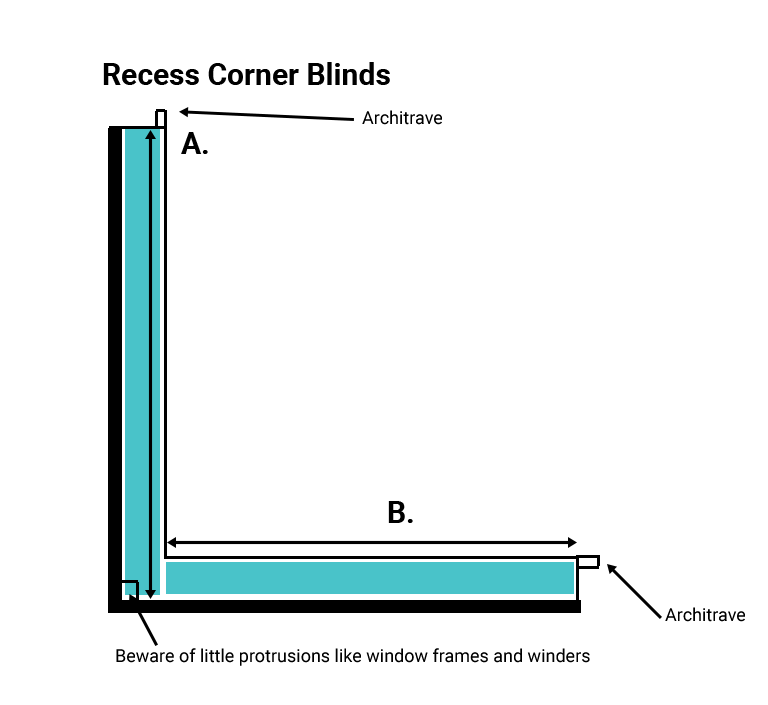
Recess (Inside Fit) Corner Blinds

Below is only a guide to illustrate how to measure for corner windows. If you are Recess Fitting, check for depth requirements are met to ensure your blind will fit inside. If you need help visualising, cut out a piece of cardboard to put inside the opening, cut it to the same depth that the blind will be (check each measuring section, for example single roller blinds are 75mm in depth)

It’s important you consult and follow each products individual measuring section.

A.   For the Run Through Blind (Inside fit) Measure the inside recess width from one end to the other, for roller blinds, measure the top part of the recess only. For other blinds measure in three spots (Top, middle & bottom) and take the smallest of the three.

B.   Measure the width in mm for the butting blind, from the inner corner to the outer edge of the recess.

Do not make any further deductions for recess mount blinds as we will do that depending on the product. If your depth is a tight fit for your blind feel free to deduct a further 3mm.

Next you need to measure the drop, again it’s best to measure in three spots, Left, Centre, and Right, use the smallest of the three measurements.

The Blinds will sit flush with the front of the reveal.

It’s always best to have the controls of the blind on the outer edges away from the point where the blinds are meeting, this will also ensure an easy mounting point for the child safety mechanisms.

If you have tiles or splash backs part way up your recess which is often the case in kitchens and bathrooms,  then the space between them is most likely to be the narrowest point in the recess.  Measure between the tiles as opposed to above them to ensure your blind fits between, unless you are measuring for roller blinds. If measuring for roller blinds measure at the top of the recess if the tile does not protrude more than 12mm into the recess, if the tile or splash back protrudes more than this then take the measurement between the narrowest part of the tiles or splash back (for when measuring for roller blinds).

Please be sure to state in the window name on the order page that it is for a corner window.

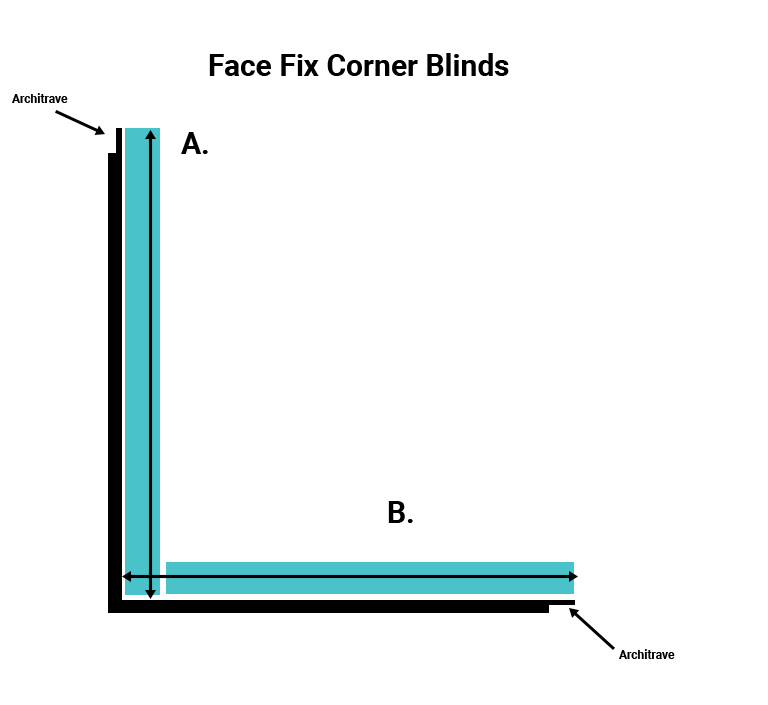
Face Fit Corner Blinds

It’s important you consult and follow each products individual measuring section.

A.  For Face mount measure from the corner to the outer edge of the architrave as shown in the diagram. Measure blinds A across the outside face of the corner window, along the surface to which the blinds will be fitted. Add the necessary amount if your blind is going past the architrave on the outer edge (depends on what product you selected, again consult each products measuring section, generally only verticals, romans, and curtains go past the architraves).

B.   Measure for the Butting blind exactly the same as in step A.

Then subtract the amount below on the width in mm from your measurement of the Butting Blind only.

Roller Blind (Face Fit):

Deduct 85mm off the width of the butting Roller Blind


Double Roller Blinds (Face Fit):

Deduct 100mm off the width of the butting Double Roller Blind


Wooden and PVC Venetians (Face Fit):

Deduct 80mm off the width of the butting Venetian Blind


Aluminium Venetians (Face Fit):

deduct 40mm off the width of the butting blind for 25mm slats

deduct 80mm off the width of the butting blind for 50mm slats


Vertical Blinds:

deduct 103mm off the width of the butting Vertical blind with 89mm slats

deduct 135mm off the width of the butting Vertical blind with 127mm slats


Curtain Tracks:

Deduct your bracket projection in mm (For adjustable brackets, deduct the smallest amount) from the butting track width, then deduct a further 5mm. Your track can be cut by hand with a hacksaw very easily if does not by any chance come to the correct width.


Roman Blinds:

deduct 50mm off the width of the butting blind

For all butting blinds that are going up into a corner Pelmet, deduct a further 5mm from above values


An Example for Roller Blinds:

Blind A is 2000mm and is the through blind

Blind B is 2000mm and is the butting blind


We need to deduct 85mm on the width from butting blind B


2000-85mm = 1915mm


Blind A width is 2000mm

Blind B width is 1915mm

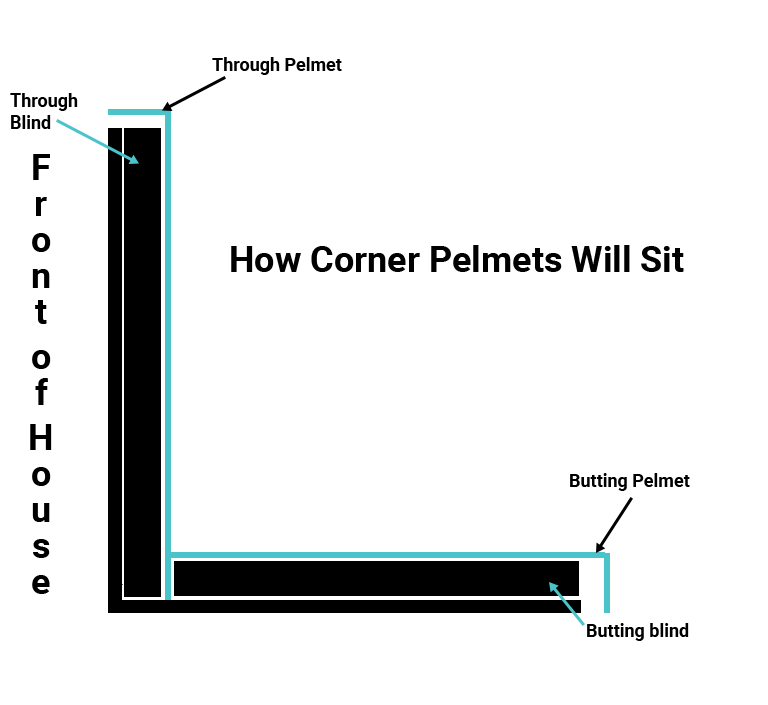
Measuring Corner Window Pelmets

Make sure there is enough room on the outer edges for the Pelmet to go past the architrave (at least 35mm of space past the edge of the outer architrave)

A.   Measure from the inner corner to the outer edge of the architrave

B.   Measure from the inner corner to the outer edge of the architrave (same as above)

Add 30mm to each A & B measurements (So the Pelmet can go past the architrave on the outer edge), unless there is no space

If you have a tricky window it’s best to send us a photo to contact@mydirectblinds.com.au so we can best advise

Then Deduct the projection size (Either 80mm, 100mm, 120mm, 150mm, 200mm) of your Pelmet from your butting pelmet only (this will be either A or B, consult butting diagram in step 1)

Examples:

Measurement A is 1400mm

Measurement B is 1400mm

We add 30mm to each so the Pelmet can go past on one side

Measurement A is now 1430mm

Measurement B is now 1430mm

Now we deduct the Pelmet Projection Size (We will use 100mm for this example):

Measurement A is the through Pelmet and is still 1430mm

Measurement B is the Butting Pelmet and is now 1430mm-100mm = 1330mm

Important for order page:

Order Measurement A Pelmet with a Right return (Missing Left)

Order Measurement B Pelmet with a Left Return (Missing Right)

Tricky Windows?

If you are unsure, it’s always best to send us a photo, we wouldn’t want any mistakes to happen! We will best advise the correct way to order

contact@mydirectblinds.com.au

Bay Window Blinds

See section below

Bay Window Pelmets

Please contact us if you require bay window pelmets, we will need a diagram drawing and we will provide specific measuring instructions for you to follow

Printable PDF Version

Please specify in checkout notes you are wanting smaller 32mm clutch and tube, these are made for mounting onto doors as they are smaller in size than the standard clutch

Single Roller Blinds

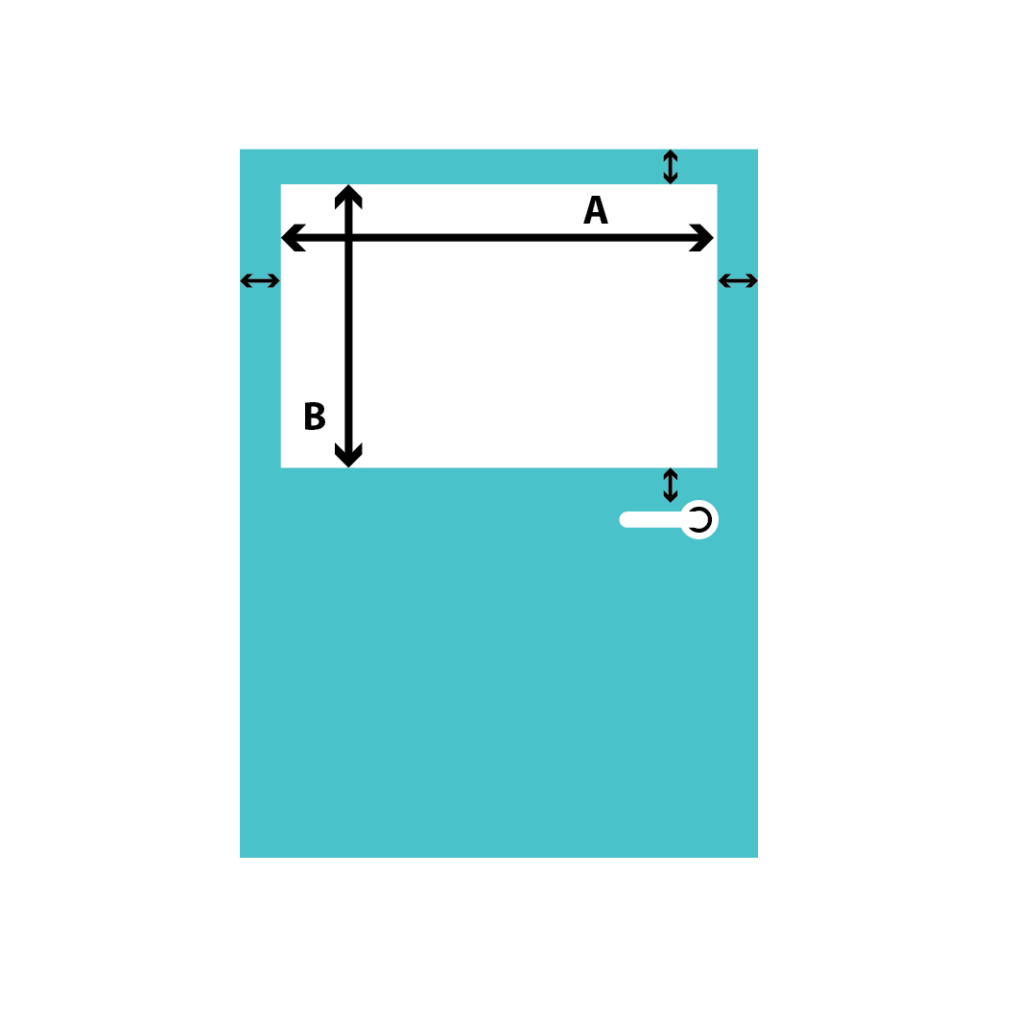
A.  Measure the width of the glass from left to right. Add 50-100mm total to the width. This will allow the fabric to sit either side of the glass

B.   Measure the drop of the glass from top to bottom. Add a minimum of 100mm to the drop (50mm top and bottom)

The fabric will project 10mm from the door with an under roll

The total blind with brackets will project out around 80mm from the door

Please be aware of any protrusions or obstructions (such as a door handle). You may need to adjust your width measurements to cater for these. (see below section)

50mm is the minimum measurement to add, if you add 50mm the fabric will cover approx 8-10mm on each side. Add more to cover more of your glass, provided your door width allows for it. (You can read about light gaps and roller blinds on the roller blind section). The fabric width is always less than the width you supply to accommodate for the operating mechanisms, we work with bracket to bracket sizes. The cloth will be 20mm less on the chain end side and about 12-15mm on the pin end side. We always recommend an under roll to minimise light gaps (provided it won’t interfere with your door handles).

Roman Blinds

A.   Measure the width of the glass from left to right. Add 40-100mm total to the width

B.   Measure the drop of the glass from top to bottom. Add a minimum of 100mm to the drop (50mm top and bottom)

These measurements may need to be adjusted to accommodate the size of your door frames

The fabric will project approx 40mm from the door, and 55mm when fully up.

Please be aware of any protrusions or obstructions (such as a door handle). You may need to adjust your measurements to cater for these.

25mm Aluminium Venetians

A.   Measure the width of the glass from left to right. Add 20-100mm total to the width. This will allow the blind to sit either side of the window.

B.   Measure the drop of the glass from top to bottom. Add a minimum of 100mm to the drop (50mm top and bottom)

These measurements may need to be adjusted to accommodate the size of your door frames

The blind will project approx 45mm from the door

Please be aware of any protrusions or obstructions (such as a door handle). You may need to adjust your measurements to cater for these.

50mm, PVC or Timber Venetians

A.   Measure the width of the glass from left to right. Add 20-100mm total to the width. This will allow the blind to sit either side of the glass.

B.   Measure the drop of the glass from top to bottom. Add a minimum of 100mm to the drop (50mm top and bottom)

These measurements may need to be adjusted to accommodate the size of your door frames

The blind will project approx 70-80mm from the door depending if fascia is used

Please be aware of any protrusions or obstructions (such as a door handle). You may need to adjust your measurements to cater for these.


Printable PDF Version

You will need card board to help you correctly assess the measurements for your bay windows. First determine the depth of the product you are mounting and use this for the width of your poster board. You can obtain this depth above on the measurement section for the specific product. (For example a single roller blind is 70mm)

Next cut out two pieces of card board that are the width of the product depth by 300mm (30cm) long. If extra clearance requires the use of extension brackets or spacer blocks, include the extra clearance to the width dimension of the card board. If you are recess fitting them, you will now be able to tell if your blinds can fit inside the recess. For Face fitting you will need to place the cardboard at a 90 degree angle to the architrave face.

Place the strips you have cut as shown below. Position strip “A” in the left angle first, then bring together strips “A” and “B” until the front corners of the poster board meet. This will give you the correct angle. Mark points “A” and “B”. Repeat for strips “C” and “D”. (Either on the flat base inside the window, or putting them on the face of the architrave and marking their spot with a pencil)

Measuring for Bay Windows

Measure from the left corner of “B” to the right corner of “C” to determine the width measurement of the centre window treatment. Measure from the right corner of “A” outward to the desired width to determine the width measurement of the left window treatment. Measure from the left corner of “D” outward to the desired width to determine the width measurement of the right window treatment.

Important: Please make us aware that the windows are bay window blinds in the ‘room name’ on the order page. Eg. Bay Window Left, Bay Window Middle, Bay Window Right

Do not make further deductions, we will make a small deduction on the middle blind.

For Roller Blinds it’s always best to over roll bay windows as there is less of a gap between each blinds fabrics

Product Depths (for cardboard templates):

Single Roller Blinds: 70mm

Double Roller Blinds: 90mm

25mm Aluminium Venetians: 55mm

50mm Aluminium Venetians: 70mm

PVC & Timber Venetians: 80mm

127mm Vertical Blinds: 80mm

89mm Vertical Blinds: 65mm

If you are unsure, best ask us first!

Plantation Shutters for Bay windows have a different way of measuring than this section, and for other products: Please consult with us over email and we will be happy to advise you on how to measure, we will need a photo. contact@mydirectblinds.com.au

You still need to select recess or face fit on the order page.

!sunboss

!5 year Warranty

!Shutters

!Basswood

!Nettex Curtain

!REVIEWS