Close
  • blinds-afterpay
Show

Effortlessly determine the dimensions of your box and bay windows for custom designer curtains featuring curved tracks.

Welcome to our straightforward tutorial on measuring your bay windows for your fresh custom designer curtains equipped with 45-degree and 90-degree curved tracks. Prepare to be delighted by how swift and effortless the process is.

You can also find guides for standard or double curtains and for those dealing with those tricky corner window setups, we’ve got a specialised guide just for you. Let’s make this curtain game a piece of cake, shall we?

Prior to getting started:

Take note: not all curtain tracks are compatible with curved curtains.

Our curved tracks are exclusively offered in our standard designer and motorised  track style ; half moon tracks are not an option. If you have a preference for half moon tracks or wish to coordinate your curved tracks with half moon ceiling tracks, please opt for  butting tracks . To acquire butting tracks, please place your order through the standard curtain product page rather than the curved curtains section. Be assured that the appropriate curtain track profile will be presented to you on the curved curtain product page.

Have you verified the angle(s) of your corner window?

Our custom-made curved curtain tracks are designed to seamlessly fit bay windows of any size. Specifically, our 90-degree curved track is tailored for bay windows with right-angle corners, commonly referred to as box bay windows. Meanwhile, our 45-degree curved track adds a stunning touch to bay windows featuring 45-degree angles.

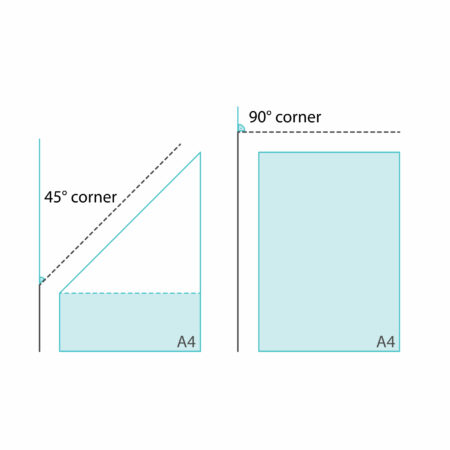
To verify if your angles are 45 degrees, take an A4 piece of paper and fold one corner to touch the opposite side, ensuring the edges align on both layers. Place the paper into a corner of your bay window. If both sides sit flush with your window, your angle is 45 degrees.

For a 90-degree angle check, simply hold up an A4 piece of paper in your corner. If the paper fits snugly, you have a 90-degree corner.

If your bay window doesn’t feature 45 or 90 degree angles, don’t worry. Contact us, and we’ll guide you through the measuring process.

Have you planned the fit of your curtains?

Let the excitement begin! If you’ve already pinpointed the ideal fit for your windows, you’re all set. If not, don’t worry—we’ll guide you through the design options below.

Does your area feature cornices?

You can choose to hang curtains on your wall or within ceiling  cornices , depending on your preference.

Are you aware of the surface where your curtains will be fixed?

Our curtains can be fixed to most surfaces, but it’s wise to research beforehand.  Wall studs  and  ceiling battens  are typically the easiest to attach to.

Have you considered motorisation?

Experience luxury every day by installing effortless, motorised curtains in your home. Silent Glide’s custom tracks with premium wired and battery-powered motors are suitable for any sized window. Simply include motorisation in your order to achieve your desired aesthetic.

Wired motors are ideal for new homes or renovations. With assistance from your electrician, you can strategically plan to conceal your motor and wiring. For instance, if you desire double motorised curtains, you can hide the wiring between your tracks.

Please note that motorisation is not available for curtains with multiple openings or free-flow tracks.

Grab your free samples, if required.

Explore our designer fabric samples hands-on. It’s the ultimate way to find the perfect curtain fabric for your home.

Requirements for Measurement

1 or 2 people

Under 10 minutes

Equipment:
• Metal tape measure
• Step ladder
• A pen and some paper

Crafting your ideal curtains

The excitement begins with envisioning how your curtains will complement your space, so unleash your inner stylist and let your creativity flow! This is your chance to discover your dream aesthetic and procure bespoke curtains that not only fit flawlessly but also serve their purpose impeccably.

Select Ceiling or Wall Fit

Enhance the height of your room with  Ceiling Curtains.  Ideal for  straight edge ceilings  and fitting inside  cornices Curtains attach best to  ceiling battens. 

• Our curved tracks flawlessly accommodate corners featuring precise 45-degree & 90-degree angles
• Enhance your comfort with motorisation and select between wired or battery-powered motors for your curtains.
• Opt for  sheer  curtains to achieve a soft, airy appearance, and choose  blockout  fabrics to effectively prevent light from entering the room
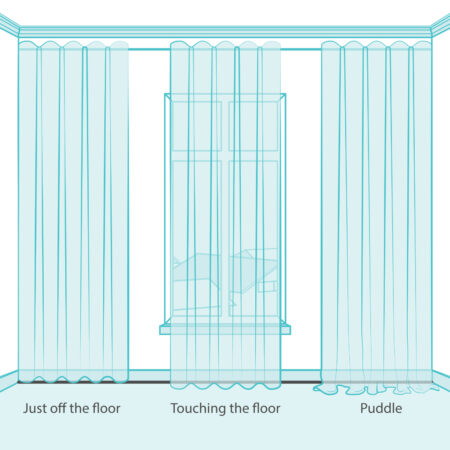
• Select from three different finishes –  just off the floor,   touching the floor  or  puddled 
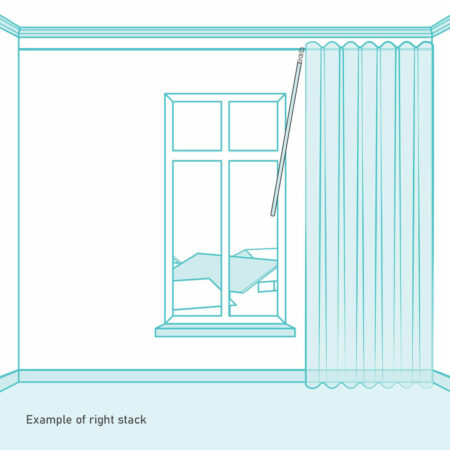
• Opt for a  left stack  or  right stack,  or consider a  centre opening  or multiple openings for easy access to your windows and doors
• Choose our designer  track  in white to harmonise with light walls, or in black or silver to coordinate with similar features in your home. Note: Half moon tracks are not available for curved tracks, unless using manual separate butting tracks.
• Select your ideal  hem 
• For longer drops, consider choosing a longer wand or opt for no  wand  at all
• Elevate your window décor by incorporating two distinct fabric types— sheer  and  blockout —using a  double track  system for seamless layering. Ask us about how to order two curved tracks for the same window.
• Tailor your track’s operating schematics by selecting either a  predetermined fixed flow  or a  flexible free flow
• Achieve a luxurious appearance with either  S-fold  curtains or opt for a classic look with  pleated curtains 
• Pair curtains with roller blinds to provide you with a comprehensive range of choices for managing both light and privacy

Seeking something distinctive? Reach out to us regarding our designer curtain rods and diverse fabric options.

To create a luxurious ambiance, drape designer curtains across your entire wall. When hanging  face fit curtains,  secure them to  wall studs  for optimal stability, or attach them to concrete, stone, brick, or tile surfaces for added versatility.

• Our curved tracks flawlessly accommodate corners featuring precise 45-degree & 90-degree angles
• Enhance the charm of period homes with lofty ceilings and intricate details such as  cornices. 
• Enhance your comfort with motorisation and select between wired or battery-powered motors for your curtains.
• Opt for  sheer  curtains to achieve a soft, airy appearance, and choose  blockout  fabrics to effectively prevent light from entering the room
• Select from three different finishes –  just off the floor,   touching the floor  or  puddled 
• Opt for a  left stack  or  right stack,  or consider a  centre opening  or multiple openings for easy access to your windows and doors
• Choose our designer  track  in white to harmonise with light walls, or in black or silver to complement similar features in your home.
• Select your ideal  hem 
• For longer drops, consider choosing a longer wand or opt for no  wand  at all
• Elevate your window décor by incorporating two distinct fabric types— sheer  and  blockout —using a  double track  system for seamless layering. Explore our double curtain measurement guide for expert tips on achieving this stylish look
• Tailor your track’s operating schematics by selecting either a  predetermined fixed flow  or a  flexible free flow
• Achieve a luxurious appearance with either  S-fold  curtains or opt for a classic look with  pleated curtains 
• Pair curtains with roller blinds to provide you with a comprehensive range of choices for managing both light and privacy

Seeking something distinctive? Reach out to us regarding our designer curtain rods and diverse fabric options.

Alright, it’s time to kick off the measuring process. Let’s break it down step by step.

Ensure you take your measurements in millimeters (mm).

Select Ceiling or Wall Fit

Step 1: Verify your corner angles

Ensure that the angles in your bay window corners measure either 45 degrees or 90 degrees (forming a right angle). If you’re uncertain or find your angles differ, don’t hesitate to reach out to us for assistance.

To verify a 45-degree angle, take an A4 piece of paper and fold one corner to meet the opposite side, aligning the edges of both layers. Place the folded paper into a corner of your bay window. If both sides snugly align with the window, your angle is 45 degrees.

For a 90-degree angle, simply hold an A4 piece of paper against the corner. If the paper fits snugly, you have a perfect 90-degree corner.

107. A4 paper-10

Step 2: Determine your widths

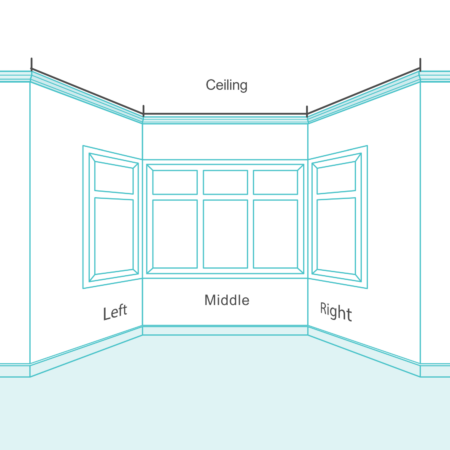
To ensure your curtains gracefully cover all three sides within your bay window, measure the width of your ceiling above the left, middle, and right sides. Begin from the outer edge of the left side, extending to the corner where your walls or cornices meet, and record the measurement. If you have  cornices,  measure from the inside.

Repeat this process for each side of your bay window and note down the measurements. These three measurements constitute your  track  width.

No need to subtract for track curves. And don’t worry about calculating fabric requirements; we’ll handle that for you based on your track width.

8. (235.) Box and Bay Curtains

Step 3: Measure your splits, totally optional.

256. Two custom splits 135 degree bay window-22

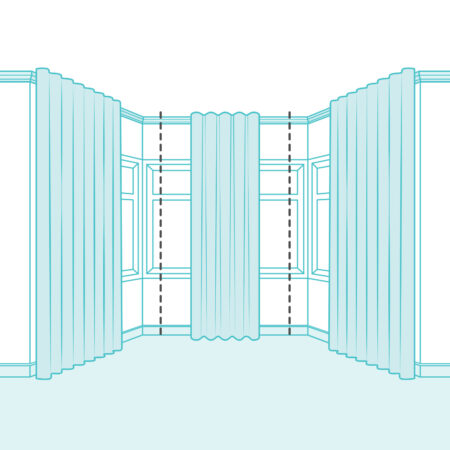
For multiple openings, you have the option to select up to 2 splits and specify their exact locations. Splitting your curtains is particularly beneficial for bi-fold and sliding doors, allowing easy access to different sections.

Indicate the number of splits desired and select the side(s) of your corner window for placement. If split measurements aren’t provided, we’ll evenly space them for you.

If you prefer not to have any splits, you can proceed to step 5.

bay_1split_measure_leftsection
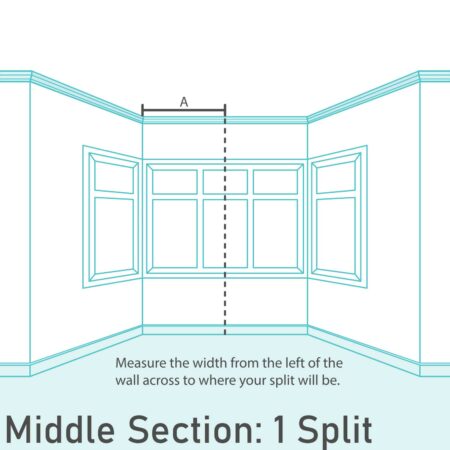
bay_1split_measure_middlesection
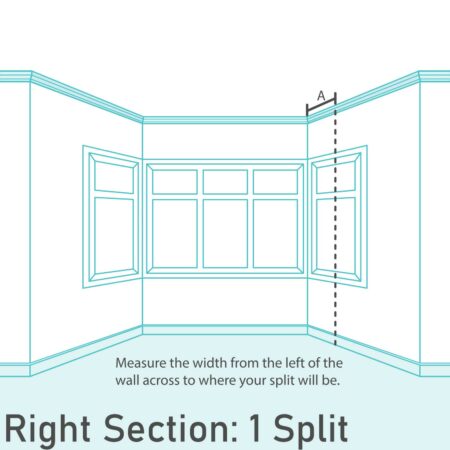
bay_1split_measure_rightsection

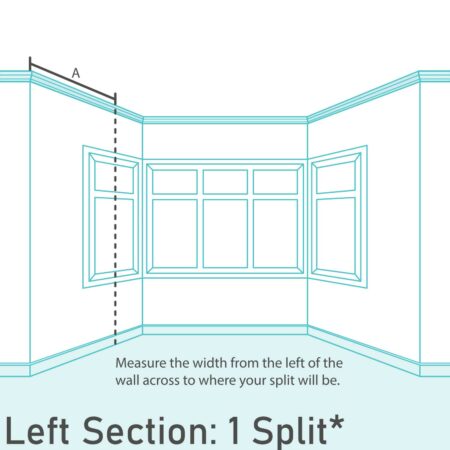
For a single custom split, measure the width from the left side across to the designated split point and record it. Ensure you measure on the wall where your split will be positioned.

*If measuring for a split on the left section of your window frame (not the middle or right section), and where you are framing your window, start your measurement from where your track will start on the ceiling and not at the start of the edge of the wall. Record this measurement. This will ensure the split measurement is accurate for your left section. Note: Do not do this if you have measured wall to wall, this should only be done if you are framing your window with curtains.

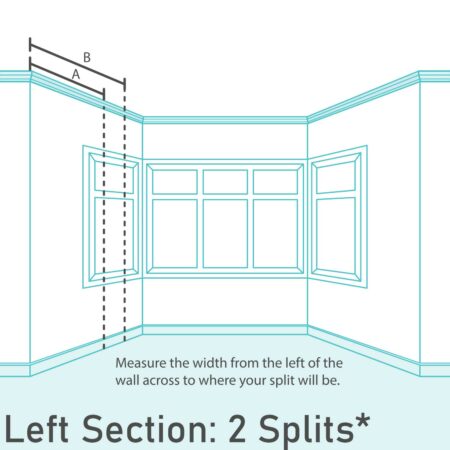
bay_2split_measure_leftsection
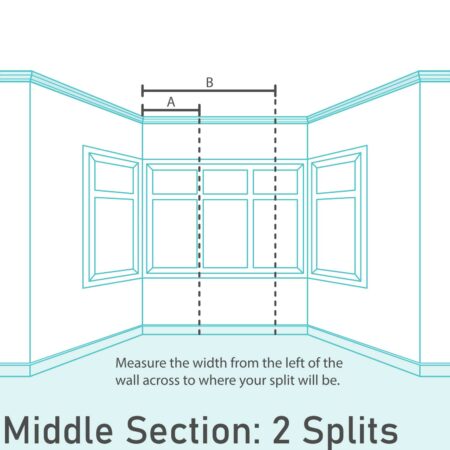
bay_2split_measure_middlesection
bay_2split_measure_rightsection

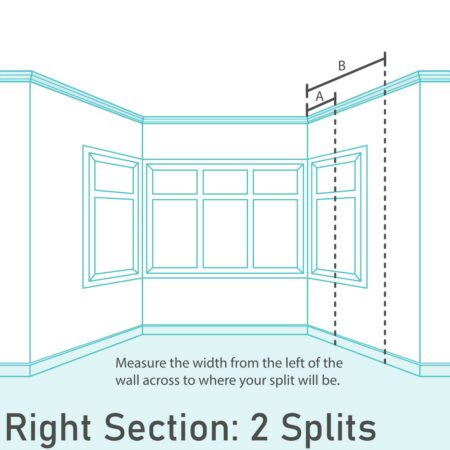
To create two custom splits, measure the widths from the left side to each split position and note them down. Ensure you measure on the respective walls where the splits will be placed.

*If measuring one or both splits on the left section of your window frame (not the middle or right section), and where you are framing your window, start your measurement from where your track will start on the ceiling and not at the start of the edge of the wall. Record this measurement. This will ensure the split measurement is accurate for your left section. Note: Do not do this if you have measured wall to wall, this should only be done if you are framing your window with curtains.

Step 4: Measure the drop

To measure for bay window curtain, follow these steps:

1. Measure from your ceiling down to the floor on the left wall, in the middle, and on the right wall. If you have cornices, measure from the inside of your cornice.
2. Note down the largest measurement among the three.

Opt for  puddling  if there is a difference of more than 10 mm between your three measurements.

Step 5: Select your preferred finish.

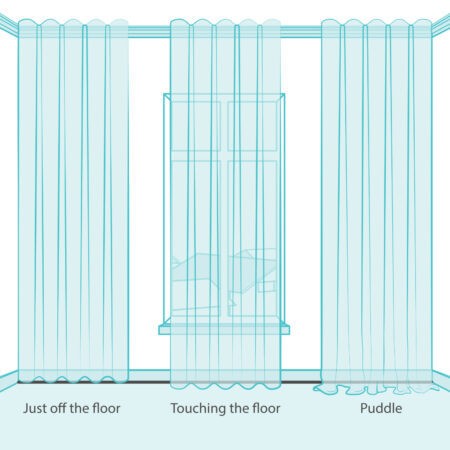
When designing and ordering your curtains, select from the three options below.

Please provide only the exact measurements, without making any deductions or additions. We will make the necessary adjustments to ensure you receive the perfect finish.

If you opt for curtains  just off the floor they will be approximately 5 – 10 mm shorter than your drop measurement and will hover just above your floor.

If you prefer curtains  touching the floor , they will skim your floor by up to 5 mm.

For  puddling  curtains, they will puddle on your floor by 20 mm. If you desire a larger puddle, please let us know in the comment section during checkout.

270. Choose the finish-34

Step 6: Select your wand, stacking preference, and track flow.

Make a note of the  wand  size you require. It may seem obvious, but the longer your drop, the larger your wand should be to ensure easy accessibility.

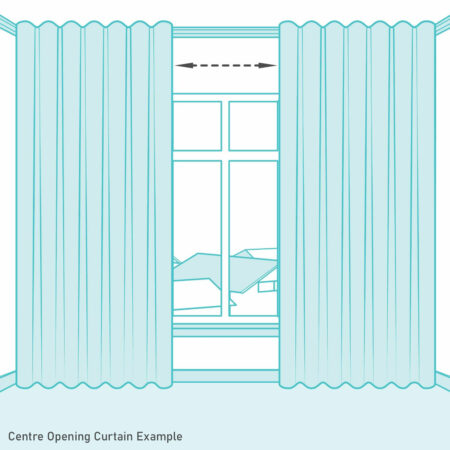
Indicate whether you prefer a  left stack,   right stack,   centre opening,  or multiple openings for your curtains. Consider which side is the most convenient to reach and free from obstructions, as well as which part of your window you anticipate opening frequently. If you opt for motorisation and select center opening curtains, specify the side for your motor placement. Please note that motorisation is not an option for curtains with multiple openings. Rest assured, we will ensure that your motor fits without requiring adjustments to your measurements.

Upon ordering, decide between a  fixed flow  track and a  free flow  track. A free flow track grants you complete flexibility in how you open and stack your curtains. However, please be aware that motorisation is not available for free flow tracks.

CENTRE_OPENING_EXAMPLE

Step 7: Finalise Your Custom Curtain Purchase Online

It’s time to seal the deal on your custom curtains! As you make your purchase, you’ll have the chance to select your preferred hem option. No need to factor in any extra measurements for the  hem  – we’ll handle that part for you.

Remember, simply provide us with the exact measurements you’ve taken in millimeters (mm); don’t worry about adjusting for your chosen finish.

Step 1: Verify your corner angles

Ensure that the angles in your bay window corners measure either 45 degrees or 90 degrees (forming a right angle). If you’re uncertain or find your angles differ, don’t hesitate to reach out to us for assistance.

To verify a 45-degree angle, take an A4 piece of paper and fold one corner to meet the opposite side, aligning the edges of both layers. Place the folded paper into a corner of your bay window. If both sides snugly align with the window, your angle is 45 degrees.

For a 90-degree angle, simply hold an A4 piece of paper against the corner. If the paper fits snugly, you have a perfect 90-degree corner.

107. A4 paper-10

Step 2: Determine your widths

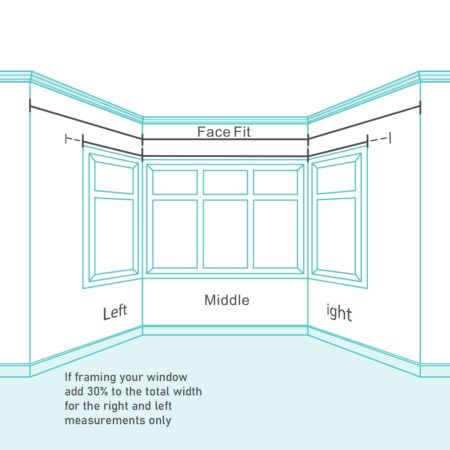
To ensure your curtains elegantly cover all three sides inside your bay window, measure the width above the left, middle, and right sides, starting from the outer edge and extending to where your walls meet. Repeat this process for each side and record the measurements, which will determine your  track  width.

For curtains framing your bay window, measure the width above your left, middle, and right windows, starting from the left outside edge of each  window frame  or  recess  and extending to where your walls meet. Add at least 30% to the measurements of the left and right windows for proper stacking off the window. These measurements also contribute to your track width. Ensure that your track can fit into the wall space after adjusting the track width.

No adjustments are needed for track curves, and fabric measurements will be handled based on your track width, so there’s no need to worry about that detail.

baymeasure_facefit-

Step 3: Measure your splits, totally optional.

256. Two custom splits 135 degree bay window-22

For multiple openings, you have the option to select up to 2 splits and specify their exact locations. Splitting your curtains is particularly beneficial for bi-fold and sliding doors, allowing easy access to different sections.

Indicate the number of splits desired and select the side(s) of your corner window for placement. If split measurements aren’t provided, we’ll evenly space them for you.

If you prefer not to have any splits, you can proceed to step 5.

bay_1split_measure_leftsection
bay_1split_measure_middlesection
bay_1split_measure_rightsection

For a single custom split, measure the width from the left side across to the designated split point and record it. Ensure you measure on the wall where your split will be positioned.

*If measuring for a split on the left section of your window frame (not the middle or right section), and where you are framing your window, start your measurement from where your track will start on the wall and not at the start of the edge of the wall. Record this measurement. This will ensure the split measurement is accurate for your left section. Note: Do not do this if you have measured wall to wall, this should only be done if you are framing your window with curtains.

bay_2split_measure_leftsection
bay_2split_measure_middlesection
bay_2split_measure_rightsection

To create two custom splits, measure the widths from the left side to each split position and note them down. Ensure you measure on the respective walls where the splits will be placed.

*If measuring one or both splits on the left section of your window frame (not the middle or right section), and where you are framing your window, start your measurement from where your track will start on the wall and not at the start of the edge of the wall. Record this measurement. This will ensure the split measurement is accurate for your left section. Note: Do not do this if you have measured wall to wall, this should only be done if you are framing your window with curtains.

Step 4: Measure the drop

Measure and mark the starting point for your curtains using a pencil. Utilise your ceiling or window frame as a guide to ensure a level starting position along the top. For optimal stability, hang your curtains from  wall studs. 

Measure the distance from where your curtains will begin to the floor on the left, middle, and right sides, then note the largest measurement.

Opt for  puddling  if there is a difference of more than 10 mm between your three measurements.

Step 5: Select your preferred finish.

When designing and ordering your curtains, select from the three options below.

Please provide only the exact measurements, without making any deductions or additions. We will make the necessary adjustments to ensure you receive the perfect finish.

If you opt for curtains  just off the floor they will be approximately 5 – 10 mm shorter than your drop measurement and will hover just above your floor.

If you prefer curtains  touching the floor , they will skim your floor by up to 5 mm.

For  puddling  curtains, they will puddle on your floor by 20 mm. If you desire a larger puddle, please let us know in the comment section during checkout.

275. Face choose finish-39

Step 6: Select your wand, stacking preference, and track flow.

Make a note of the  wand  size you require. It may seem obvious, but the longer your drop, the larger your wand should be to ensure easy accessibility.

Indicate whether you prefer a  left stack,   right stack,   centre opening,  or multiple openings for your curtains. Consider which side is the most convenient to reach and free from obstructions, as well as which part of your window you anticipate opening frequently. If you opt for motorisation and select center opening curtains, specify the side for your motor placement. Please note that motorisation is not an option for curtains with multiple openings. Rest assured, we will ensure that your motor fits without requiring adjustments to your measurements.

Upon ordering, decide between a  fixed flow  track and a  free flow  track. A free flow track grants you complete flexibility in how you open and stack your curtains. However, please be aware that motorisation is not available for free flow tracks.

193b

Step 7: Finalise Your Custom Curtain Purchase Online

It’s time to seal the deal on your custom curtains! As you make your purchase, you’ll have the chance to select your preferred hem option. No need to factor in any extra measurements for the  hem  – we’ll handle that part for you.

Remember, simply provide us with the exact measurements you’ve taken in millimeters (mm); don’t worry about adjusting for your chosen finish.

!sunboss

!5 year Warranty

!Shutters

!Basswood

!Nettex Curtain

!REVIEWS