How to Clean Curtains the Right Way
Curtains really tie a room together, don’t they? But over time, they can get a bit dusty and lose their sparkle. Figuring out how to clean curtains can seem like a big task, especially with all the different fabrics out there. You don’t want to ruin them, right? Well, don’t sweat it. We’ve put together some straightforward tips to help you get your curtains looking fresh and clean without all the fuss. It’s not as complicated as you might think!

Key Takeaways
- Always start by checking the care label on your curtains for specific cleaning instructions.
- Regular dusting and vacuuming are your best friends for preventing heavy buildup.
- For machine washing, use a gentle cycle with cold water and mild detergent, and consider mesh bags. We do advise against this as it’s very risky. Care Labels will generally advise against machine wash.
- Hand washing delicate fabrics requires lukewarm water and gentle handling, avoiding wringing.
- Always air dry curtains in a shaded area, avoid machine dry and iron carefully if needed.
Following the care labels is the easiest way to understand what to do… For Australia the WSAA has the care labels you’ll need to reference.
For our Blockout Curtains with Rubber Backing: Care Code 6W Vacuum the curtains gently and on a regular basis to remove dust and debris. Begin by removing hooks, rings and trims. When spot cleaning, be sure to exercise caution and test clean on non exposed surface. Do not use a domestic washing machine. Instead, professional wet cleaning using mild detergents (such as wool mixes) is recommended. Take care to prevent the coated sides from touching, by hanging curtains by their hooks. Do not use pegs or fold over a clothes line. Do not iron the coated side of the fabric, iron the fabric side only. Please take note that all fabrics may shrink by up to 3% after cleaning
For our Sheers:
Care Code 4 Vacuum the curtains gently and regularly to remove dust and debris. Begin by removing hooks, rings and trims. When washing is needed, only hand wash and do not bleach. Ensure that you do not rub or wring the curtains. Immediately hang the curtains by their hooks to damp dry in the shade. When ironing, you must not exceed 150°c. Please take note that all fabrics may shrink by up to 3% after cleaning. Dry cleanable ℗ 50.
Understanding Your Curtain’s Fabric Type
Before you even think about water, detergent, or a washing machine, the very first thing you need to do is figure out what your curtains are actually made of. This isn’t just about looking pretty; the fabric type dictates the entire cleaning process. Throwing the wrong curtain into the wash could lead to a wrinkled mess, faded colors, or even complete ruin. So, let’s get this right.
Always Check The Care Label First
Seriously, this is the golden rule. Tucked away somewhere on your curtain – usually along a seam or hem – is a small tag. This little guy is your curtain’s instruction manual. It’ll tell you if it’s machine washable, if it needs a special cycle, or if it’s a dry-clean-only situation. Ignoring this label is like trying to assemble furniture without the instructions; you’re just asking for trouble. If there’s no label, or it’s faded beyond recognition, you’ll need to do a bit more detective work like calling the place you bought them from, or researching the material it’s made out of.
Identifying Delicate Materials Like Silk and Velvet
Some fabrics just scream ‘handle with care.’ Silk, for instance, is beautiful but can be damaged by harsh chemicals or too much agitation. It often requires a gentle hand wash in cool water with a mild detergent. Velvet is another one that needs special attention. While some velvets can be machine washed on a very gentle cycle, others are best left to professionals. You might notice a soft sheen and a plush texture – these are clues. For velvet, brushing it gently with a soft brush in the direction of the nap can help maintain its look, but avoid getting it too wet or wringing it out.
Recognising Synthetic Fabrics
Polyester, nylon, and acrylic are your more common synthetic fabrics. These guys are generally pretty forgiving and can often handle machine washing. They tend to be more durable and less prone to shrinking or fading compared to natural fibers. You might find they feel a bit smoother or have a slight sheen. While they’re usually easier to clean, it’s still wise to check that care label, especially if they have any special finishes or treatments. Even synthetics can sometimes have specific cleaning needs to keep them looking their best.
Essential Preparations Before Cleaning
Before you even think about tossing your curtains into the washing machine or giving them a good scrub, there are a few things you absolutely need to do. Skipping these steps can lead to some serious curtain catastrophes, like faded colors or even ruined fabric. So, let’s get these prep steps out of the way first.
Test For Colorfastness
This is super important, especially if your curtains are brightly colored or have intricate patterns. You don’t want to end up with a muddy mess where your vibrant blues turn into a dull grey. To test, grab a small, hidden spot on your curtain – maybe the back of a hem. Mix a little bit of your chosen detergent with warm water and dab it onto the hidden spot. Let it sit for a minute, then gently rub it with a white cloth. If any color transfers to the cloth, or if the fabric looks different, it’s a sign that the color might bleed. In that case, you might want to reconsider washing them yourself and look into professional cleaning services instead.
Remove Hardware and Accessories
Take a good look at your curtains. See those little hooks, rings, or any decorative trim? Those need to come off before washing. They can snag on the fabric, damage your washing machine, or even get lost. It’s usually pretty straightforward – just slide them off or unclip them. Keep them all together in a small bag so you don’t lose any pieces.
Pre-Treat Stains Effectively
Curtains can pick up all sorts of marks, from dusty fingerprints to mysterious splatters. Before a full wash, it’s best to tackle these spots directly. Gently blot the stain with a clean cloth and a mild stain remover or a bit of diluted detergent. Work from the outside of the stain inward to avoid spreading it. Let the pre-treatment sit for a bit, following the product’s instructions, before proceeding with the main wash. This targeted approach makes a big difference in getting your curtains truly clean.
Routine Maintenance for Longevity
Keeping your curtains looking good doesn’t have to be a huge chore. A little bit of regular upkeep can make a big difference in how long they last and how fresh your rooms feel. Think of it like brushing your teeth – a quick daily habit that prevents bigger problems down the road.
Regular Dusting and Vacuuming Techniques
Dust is sneaky. It settles on everything, and curtains are like big, fluffy dust magnets. The best way to fight this is to tackle it before it really digs in. A quick dusting every few weeks can stop dust from building up and making your curtains look dull. You can use a soft brush or a microfiber duster. If you have a vacuum cleaner, the upholstery attachment is your best friend here. Just a gentle pass over the fabric, working from top to bottom, can suck up a surprising amount of dust and pet hair. It’s not about deep cleaning yet, just keeping that surface layer of grime at bay.
Spot Cleaning Minor Spills
Life happens, right? A splash of coffee, a smudge of something mysterious – it’s bound to happen. When you notice a small spot, don’t panic and don’t just leave it. Grab a clean cloth and some mild soap mixed with water. The trick here is to dab, not rub. Rubbing can spread the stain and damage the fabric fibers. Gently blot the area, working from the outside of the stain inward. You might need to repeat this a couple of times, but it’s usually much easier to deal with a fresh spot than one that’s set in.
Weekly Vacuuming for Allergen Control
Curtains aren’t just pretty; they’re also part of your home’s air filtration system, whether you like it or not. They trap dust, pollen, and other little bits floating around. If you or someone in your household has allergies, keeping those curtains clean is extra important. A quick vacuum session once a week, especially during allergy seasons, can really help cut down on airborne irritants. It’s a simple step that contributes to a healthier living space for everyone.
Don’t forget the hardware! While you’re dusting or vacuuming the fabric, give the curtain rods, finials, and any other decorative bits a quick wipe-down too. They collect dust just as much as the curtains do, and keeping them clean adds to the overall polished look.
Machine Washing Curtains Safely
So, you’ve checked the label, and it says your curtains can handle a spin in the washing machine. Great! This can be a real time-saver compared to hand washing. But, you’ve got to be careful. Throwing them in like a load of towels is a recipe for disaster. We’re talking stretched-out fabric, faded colors, or even tears. Let’s go over how to do it right.
Choosing the Right Detergent
This is super important. You want to use a mild detergent. Think of it like choosing a gentle soap for your skin; harsh chemicals can really damage fabric over time. Definitely skip the bleach – it’s way too strong and can ruin the color and the fibers themselves. A good quality, mild laundry detergent is your best bet. If you’re washing something a bit more delicate, like sheers, a detergent made for delicates is even better. Some people even use a bit of vinegar in the wash for certain types of curtains, like blackout ones, as an alternative cleaning agent.
Selecting the Gentle Cycle and Cold Water
Your washing machine probably has a bunch of settings, but for curtains, you’ll want to stick to the gentlest ones. The ‘delicate’ or ‘gentle’ cycle is what you’re looking for. And always, always use cold water. Hot water can cause shrinkage, especially with natural fibers like cotton or linen, and it can also set wrinkles more firmly. Cold water is just safer for most curtain fabrics. Make sure your machine isn’t overloaded, either. Curtains need room to move around freely so they don’t get bunched up and damaged. If your machine is on the smaller side, you might need to wash them in batches or consider using a laundromat with a larger capacity machine.
Using Mesh Bags for Protection
For curtains made of more delicate materials, like lace or very fine synthetics, a mesh laundry bag is a lifesaver. You know, those zippered bags you can get? Pop your curtains inside one (or maybe two if they’re bulky). This creates a protective barrier, reducing friction and preventing snagging or stretching during the wash cycle. It’s a simple step, but it makes a big difference in keeping your curtains looking good. It helps keep hardware from getting caught on other items too, though you should always remove hardware beforehand if possible.
Washing curtains in a machine requires a bit more thought than your everyday laundry. It’s about protecting the fabric from harsh agitation and heat. By choosing the right settings, detergent, and protective measures, you can successfully clean most machine-washable curtains without any issues.
Here’s a quick rundown:
- Detergent: Mild, non-bleach formula.
- Cycle: Delicate or gentle.
- Water Temp: Cold.
- Load Size: Don’t overcrowd the machine.
- Protection: Use mesh bags for delicate fabrics.
Hand Washing Delicate Draperies
Sometimes, your curtains are just too special, too fragile, to toss into the washing machine. Think silks, velvets, or anything with intricate beading or embroidery. For these beauties, hand washing is the way to go. It gives you the most control and is the gentlest approach.
Preparing a Lukewarm Water Bath
First things first, you’ll need a large basin or a clean bathtub. Fill it with lukewarm water. You don’t want it too hot, as that can damage delicate fibers, and cold water might not get them clean enough. The goal is a gentle temperature that mimics a comfortable bath. Next, add a small amount of mild detergent. Look for one specifically designed for delicates or even a gentle dish soap. Avoid anything with bleach or harsh chemicals, as these can strip color and weaken the fabric over time. Give the water a gentle swirl to mix the soap in before you introduce the curtains.
Gentle Agitation and Squeezing
Now, carefully submerge your curtains into the soapy water. Don’t just stuff them in; let them soak for a bit. Gently swish the fabric around with your hands. Think of it like giving them a soft massage, not a vigorous scrub. You want to loosen dirt and grime without stressing the threads. Let them soak for about 10-15 minutes, depending on how dirty they are. After the initial wash, drain the dirty water and refill the basin with clean, lukewarm water for rinsing. Repeat the gentle swishing process until all the soap is gone. You might need to change the rinse water a couple of times to be sure. It’s really important to get all the soap out, otherwise, it can leave residue that attracts more dirt later on.
Avoiding Wringing and Twisting
This is probably the most critical step when hand washing. Once your curtains are rinsed, do not wring them out. Seriously, resist the urge! Wringing and twisting can stretch the fabric out of shape, create permanent creases, and even cause tears, especially in older or more fragile materials. Instead, gently lift the curtains from the water and let them drip for a moment. Then, carefully squeeze out the excess water, working from the top down. You can also lay them flat on a clean towel and gently roll them up to absorb more moisture. Remember, patience is key here. For very delicate items, you might even consider professional cleaning services that specialise in fine draperies.
Drying and Finishing Your Curtains
Alright, so you’ve gone through the whole washing process, and your curtains are finally clean. Now comes the part where you need to be a little careful so you don’t mess up all your hard work. Drying and finishing are pretty important steps.
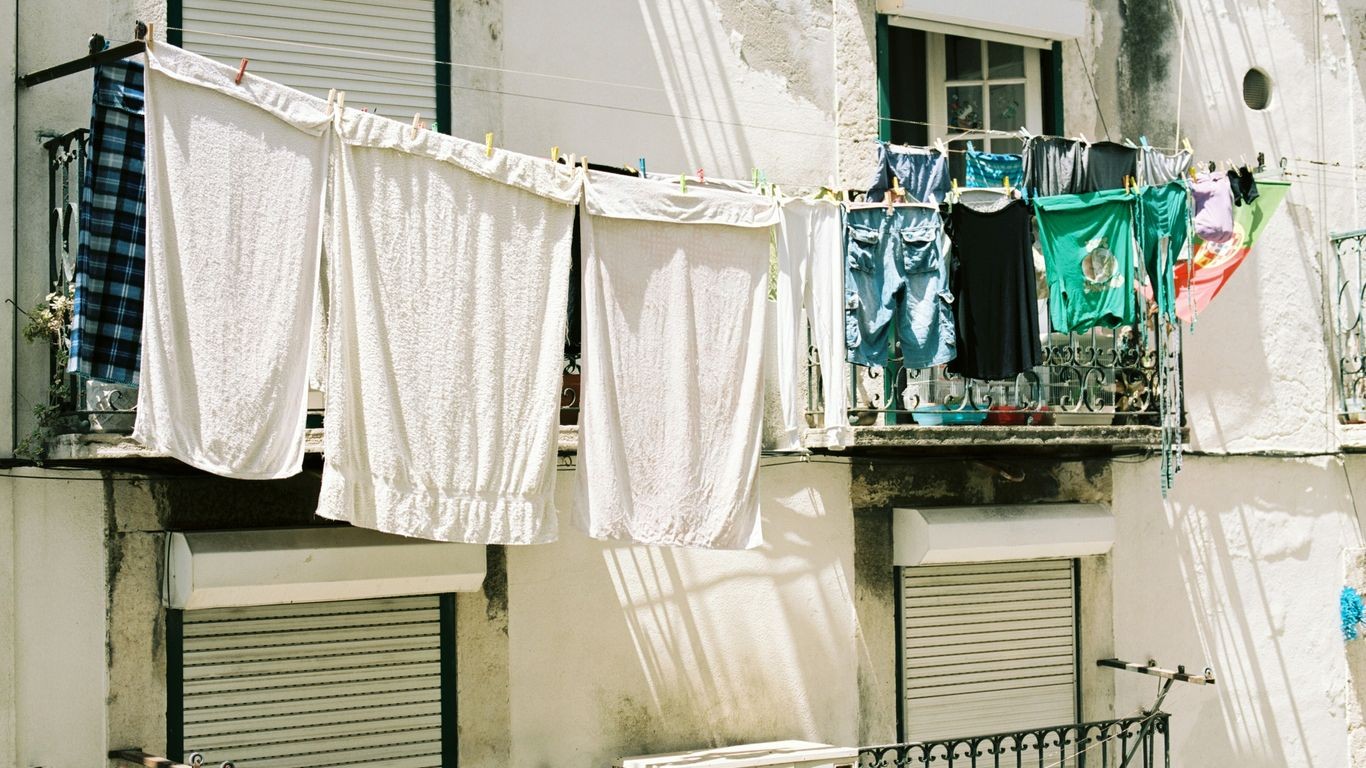
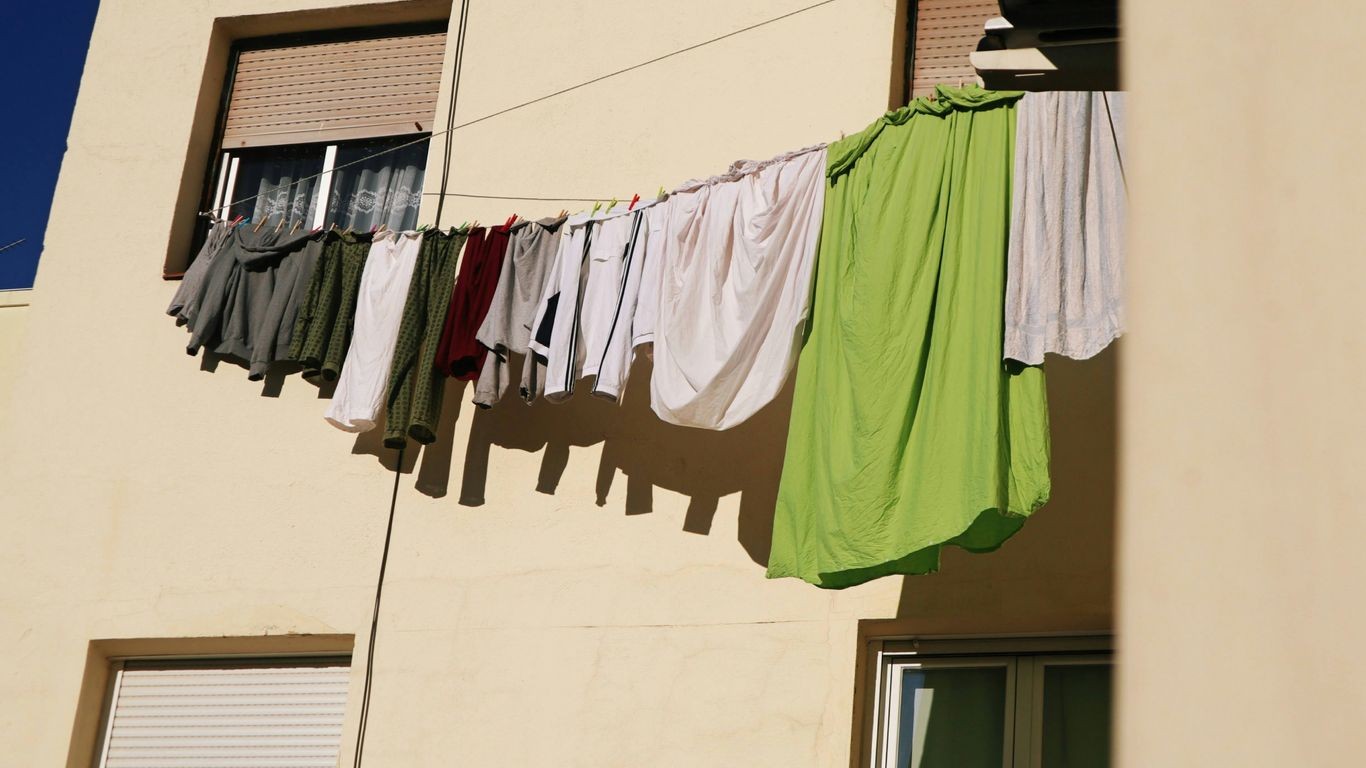
Air Drying in a Shaded Area
This is usually the safest bet, especially for more delicate fabrics. You want to avoid direct sunlight because it can really fade the colors over time, and nobody wants dingy-looking curtains. Find a spot with good airflow, maybe outside on a clothesline if the weather’s nice, but make sure it’s out of the sun. If you’re drying them inside, hang them up somewhere with plenty of ventilation, away from any heat sources like radiators. It might take a few hours, or even a full day, depending on how thick the fabric is and what the weather’s like. Just let them hang and do their thing.
Tumble Drying on Low Heat Settings
Some curtains can handle a tumble dryer, but you’ve got to be smart about it. Always check that care label first! If it says it’s okay, use the gentle or delicate setting, and definitely use low heat. High heat is the enemy here; it can cause shrinkage or even damage the fibers. A good trick is to pull them out when they’re still slightly damp, not bone dry. This helps prevent wrinkles from setting in, making the next step a lot easier. You might need to do them in batches if you have a lot of curtains or a smaller machine.
Ironing Techniques for Wrinkle Removal
Once your curtains are dry, or just slightly damp if you tumble-dried them, it’s time to tackle any wrinkles. If they’re still a bit moist, ironing will be much easier. For most fabrics like cotton or linen, you can use a standard iron on a low to medium setting. It’s often best to iron on the reverse side of the fabric to avoid any shiny marks. If you have synthetic curtains or ones with a special lining, like blackout curtains, direct heat from an iron can be too much. In those cases, a garment steamer is your best friend. Just a few passes with a steamer on a low setting should smooth things out nicely. After ironing or steaming, rehang them right away so any remaining dampness can evaporate and the wrinkles stay gone. You can find some great curtain cleaning tips online if you need more specific advice.
Remember, the goal is to restore your curtains to their former glory without causing any new damage. Patience is key during the drying and finishing stages.
When to Consider Professional Cleaning
Sometimes, no matter how hard you try, your curtains just need a professional touch. It’s not a sign of failure; it’s just recognizing when a job is a bit beyond DIY. For certain types of curtains, taking them to a specialist is the safest bet to avoid damage and get them looking their best.
Handling Heavily Interlined Curtains
Curtains with extra layers, like interlining, are often quite thick and can be tricky to clean at home. These layers add insulation and structure, but they also mean more fabric to manage and dry. Washing them incorrectly can lead to uneven drying, mildew growth, or the layers separating. A professional cleaner has the equipment and knowledge to handle these bulky items without causing harm.
Special Care for Pleated or Intricate Designs
If your curtains have delicate pleats, elaborate trims, or complex patterns, they might require specialized cleaning. Machine washing or even vigorous hand washing can easily flatten pleats or damage embellishments. Professionals can often use steam or specific techniques to clean these details while preserving their shape and integrity. It’s really about protecting those fancy bits that make your curtains unique.
Dealing with Stubborn Stains or Sun Damage
Got a stain that just won’t budge, or has the sun really faded your curtains over time? These issues can be tough to tackle on your own. Professionals have access to stronger cleaning solutions and treatments that can address deep-set stains or help mitigate the appearance of sun damage. They can assess the fabric and choose the right approach to minimize further harm. Don’t risk making a bad situation worse with harsh home remedies.
Here’s a quick rundown of when to call in the pros:
- Heavy or Multi-Layered Fabrics: Think velvet, brocade, or curtains with built-in liners.
- Delicate Embellishments: Beads, sequins, fringe, or intricate embroidery.
- Permanent Creases or Pleats: Curtains that need their structure maintained.
- Significant Stains: Grease, ink, or old, set-in spots.
- Fading or Sun Bleaching: When the color has noticeably changed.
While it might seem like an added expense, professional cleaning can actually save you money in the long run by preventing damage that would require costly replacement. It’s an investment in keeping your home looking its best.
Wrapping Up Your Curtain Care
So there you have it! Cleaning your curtains doesn’t have to be a huge chore. By following these tips, you can keep them looking fresh and new, making your whole home feel a bit brighter. Remember to always check those care labels first, and don’t be afraid to treat delicate fabrics with extra gentleness. A little regular upkeep goes a long way, and soon enough, you’ll have curtains that look like they just came out of the store. Happy cleaning!
Frequently Asked Questions
How often should I clean my curtains?
For most homes, a good deep clean every 3 to 6 months is usually enough. If you have heavy curtains or ones with lots of folds, you might want to clean them more often. Also, if you have pets or allergies, vacuuming them weekly can really help cut down on dust and pet hair.
Can I just throw my curtains in the washing machine?
You can, but only if the care label says it’s okay! Always check that label first. If it’s safe, use a gentle cycle with cold water and a mild detergent. For really delicate curtains like silk or velvet, it’s often better to hand wash them or even get them dry cleaned.
What’s the best way to dry curtains after washing?
The safest bet is usually to air dry them in a shady spot. If you use a dryer, pick the lowest heat setting and take them out when they’re still a little damp to avoid wrinkles. Never use high heat, as it can damage the fabric.
How do I handle tough stains on my curtains?
For small spots, try dabbing gently with a damp cloth and a little bit of mild soap. Don’t rub too hard, as that can spread the stain or damage the fabric. If the stain is really stubborn or you’re worried about ruining the curtain, it might be best to take it to a professional cleaner.
My curtains are made of silk or velvet. How do I clean those?
These materials are super delicate. For silk, it’s best to hand wash with cool water and a very mild soap, and never wring them out. Velvet can sometimes be cleaned with a gentle brushing, but often professional cleaning is the safest way to keep them looking great without damage.
What if my curtains are really big or have special designs?
For curtains that are very large, heavy, have special pleats, or intricate designs, it’s often a good idea to let a professional cleaning service handle it. They have the right tools and knowledge to clean them without causing them to shrink, lose their shape, or get damaged.